Your concealer is not broken — it is doing the wrong job. Most under-eye darkness is a colored shadow (blue, purple, or brown), and asking a beige cream to erase a colored shadow is asking it to fail. That ashy, grey, muddy under-eye you have been fighting for years is not your concealer's fault — it is the missing step before the concealer. Color correcting is just color theory applied to skin: the right warm pigment cancels the right cool shadow, then a thin layer of concealer brings the whole area back to a neutral, skin-like finish. Once you understand which color cancels which shadow on which skin tone, your under-eyes change permanently.
The Color Theory Behind Dark Circle Correction
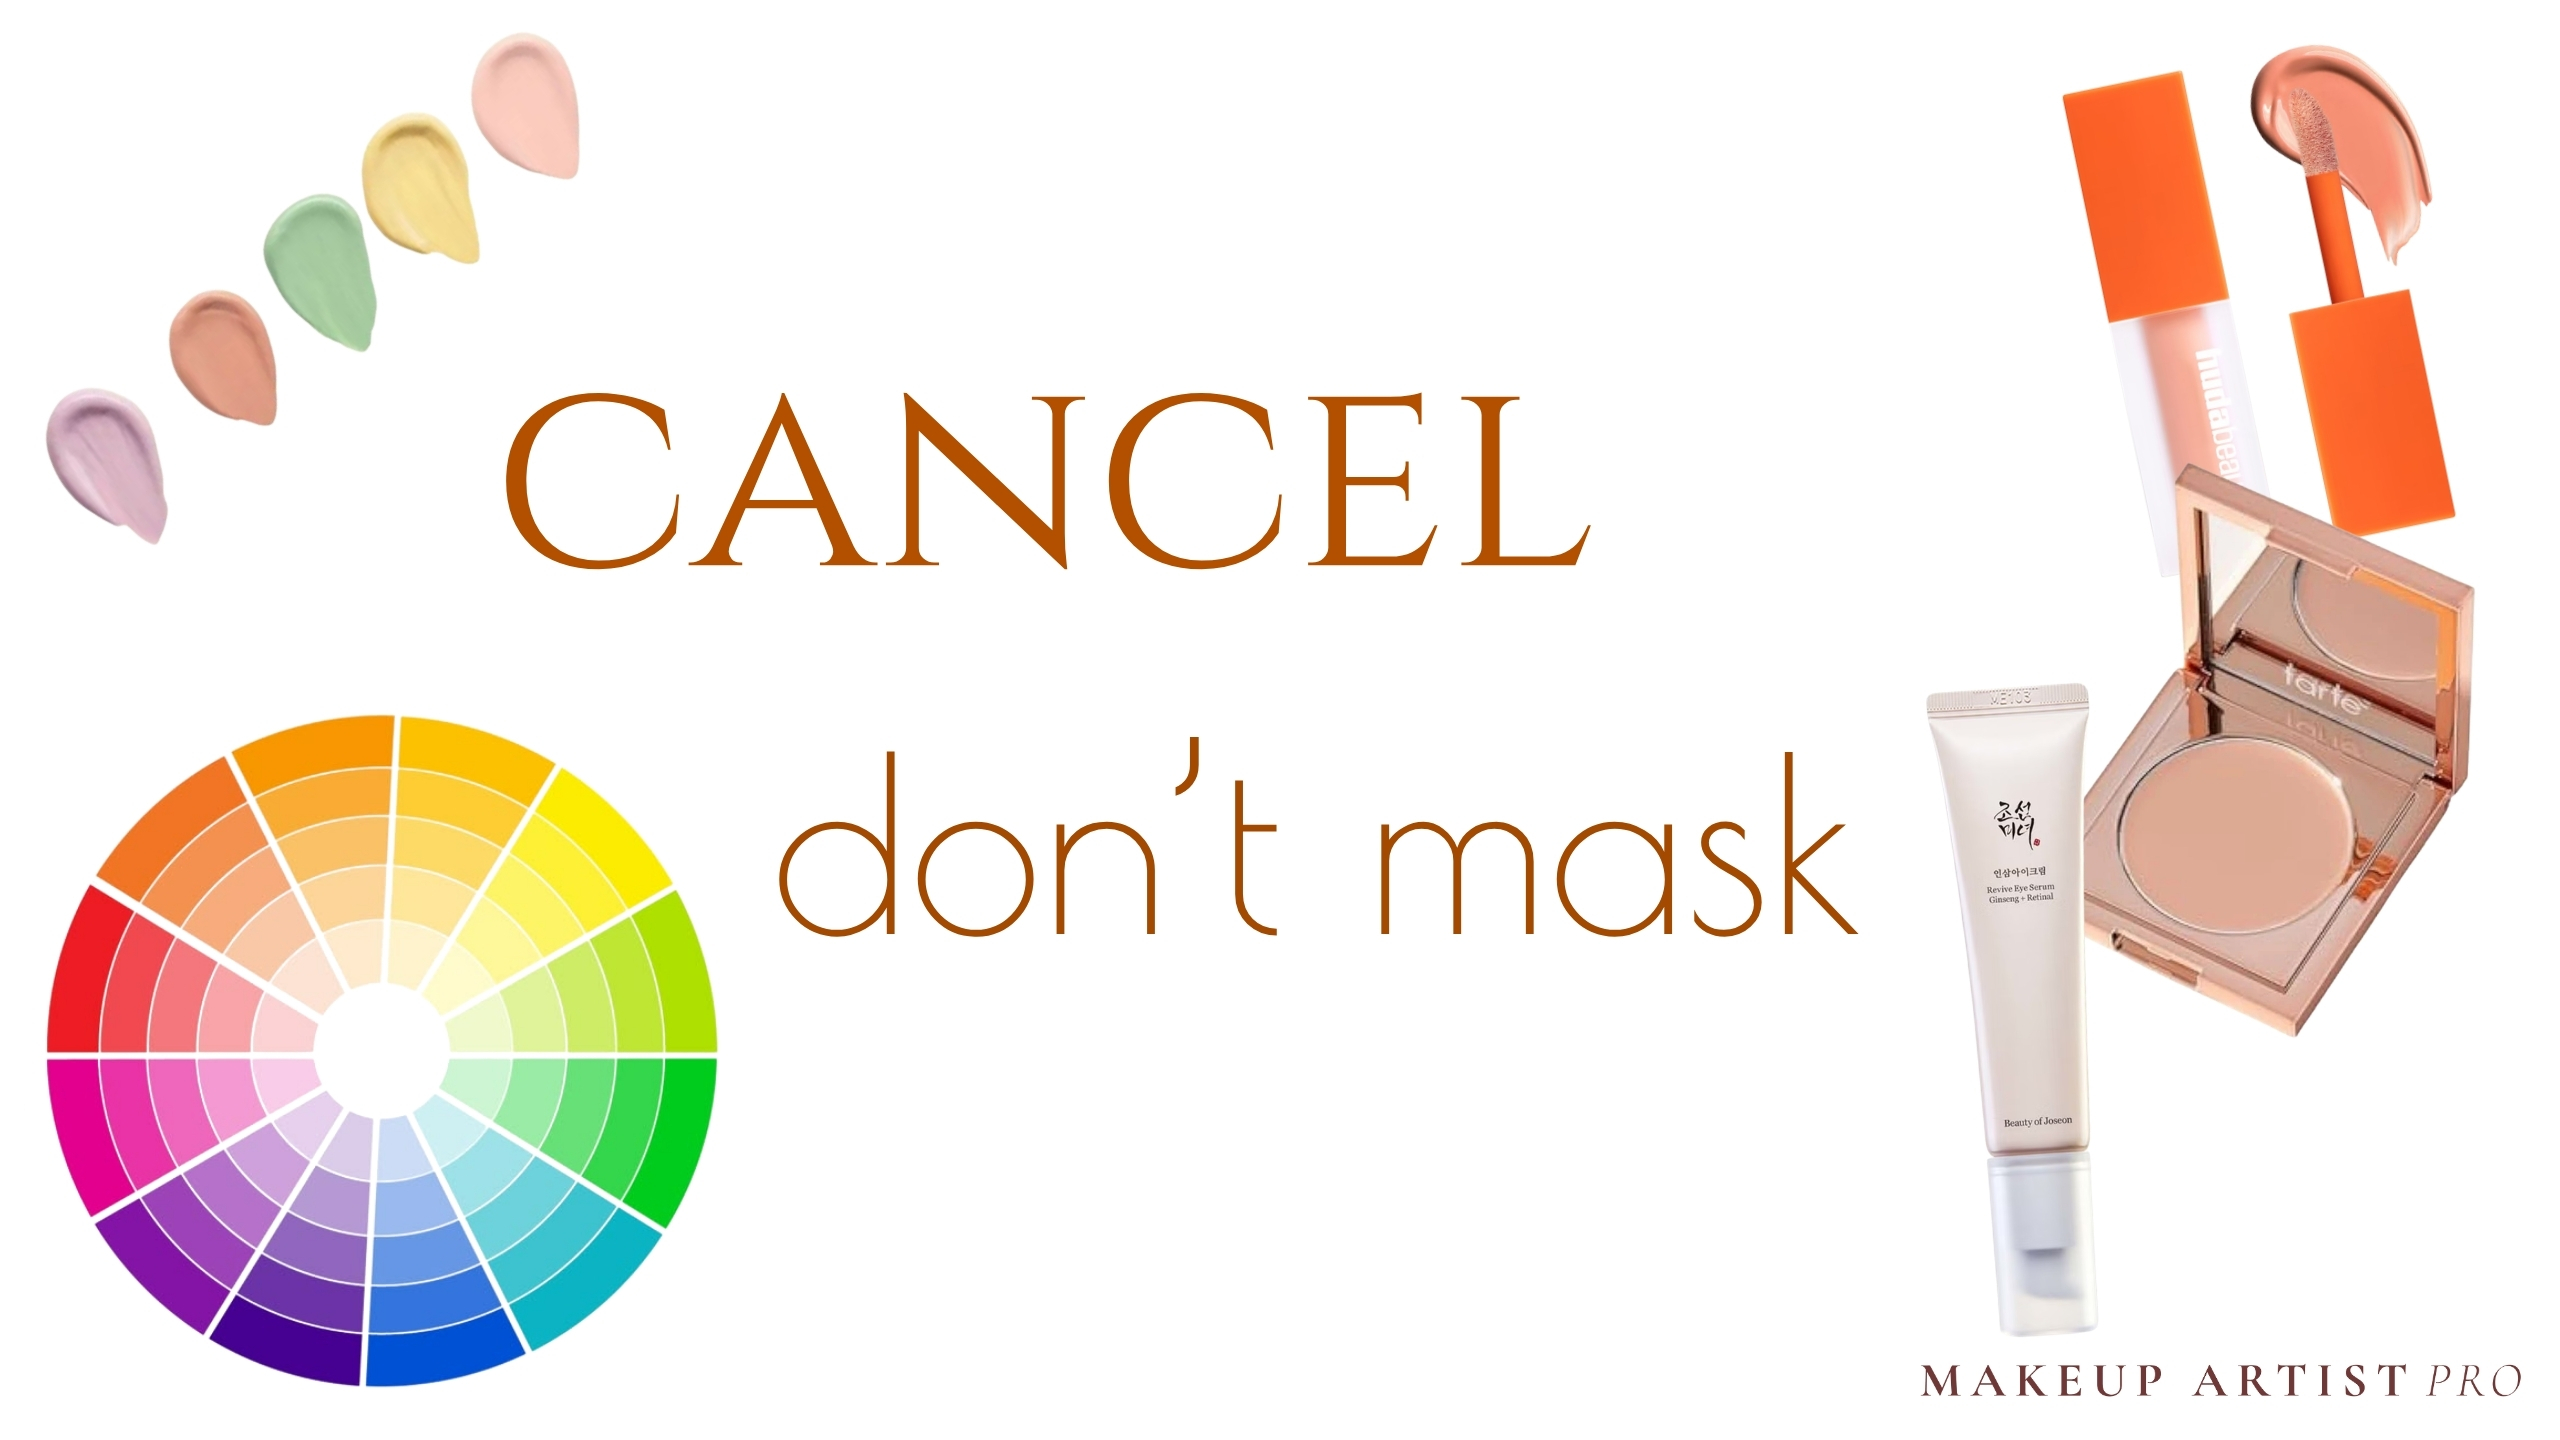
Color correction is not a trick or a trend. It is straight color theory applied to skin, and once you understand the logic, every confusing tube of orange or peach cream in the beauty aisle suddenly makes sense. The rule is simple: opposite colors on the color wheel cancel each other out. Your under-eyes are showing a color you do not want, so you neutralize it with the color directly across from it before you ever touch concealer. Skip this step and you spend the rest of your morning piling on concealer to bury a shadow that a thin layer of the right pigment would have erased in seconds.
Here is the cheat sheet you can memorize in thirty seconds. Peach cancels light blue. This is the most common pairing because most fair-skinned dark circles are vascular blue. Orange cancels deeper blue and blue-grey, the shadows you see under olive and tan skin. Red and brick cancel purple-brown, the stubborn pigmentation that sits under medium-to-deep skin tones. Yellow cancels purple, which shows up in shadows that read more violet than blue. Green cancels red — but green has almost no place near your under-eyes unless you are also correcting visible capillaries, and even then it is a redness fix, not a dark circle fix. If you see a tutorial telling you to put green corrector under your eyes for darkness, scroll past it.
Find your shadow's color on the wheel, then look directly across — that opposite is your corrector. Blue → orange, violet → yellow, red → green.
The reason this works is wavelength math. When two complementary colors overlap, they cancel each other into a neutral mid-tone that your concealer can then cover with a fraction of the product. Without correction, your concealer is trying to hide a colored shadow with a beige cream — and beige does not erase blue. It just lays a thin opaque film over it that goes ashy by lunch. Correction first, concealer second. That order is non-negotiable.
What's Actually Causing Your Dark Circles
Before you choose a corrector, you have to diagnose what you are actually looking at. Three different things get lumped under "dark circles," and only two of them respond to color correction at all.
Vascular dark circles are the most common, especially in fair-to-light skin. The under-eye skin is the thinnest skin on your entire body, and underneath it sits a dense network of capillaries. Light passes through that thin skin, hits the deoxygenated blood in those capillaries, and bounces back as a blue or blue-purple shadow. If yours look bluish, get more pronounced when you are tired or dehydrated, and feel cool to the touch, this is you.
Pigmented dark circles are caused by excess melanin in the under-eye area — not light passing through skin, but actual brown pigment sitting in it. This is far more common in medium, tan, deep, and rich skin tones, and it often shows up alongside post-inflammatory hyperpigmentation, sun damage, or genetic predisposition. The shadow reads warm — brown, bronze, or deep purple-brown — and it does not change when you pull the skin taut. If yours look the same color whether you are well-rested or exhausted, this is pigmentation, not vascular.
Structural shadows are the trickiest because no corrector on earth will fix them. These are tear-trough shadows caused by the anatomy of your face — the bone underneath your eye dips inward and casts an actual shadow, the way a hat brim casts a shadow on your forehead. There is no pigment to neutralize. The "darkness" is just absence of light. The only fix is brightening (a concealer one to two shades lighter than your foundation, placed strategically in the trough) or filler if you want to address it cosmetically. Color correcting a structural shadow makes it worse — the warm pigment sits in the hollow and looks muddy.
Caused by visible blood vessels through thin skin. Most common in fair-to-light tones. Corrector: peach or salmon. Reads cool, gets worse when tired or dehydrated.
Caused by excess melanin or post-inflammatory hyperpigmentation. Common in medium, tan, and deep tones. Corrector: orange, red, or brick. Reads warm, stays consistent regardless of sleep.
Caused by bone structure, not pigment — a true hollow that casts a shadow. Corrector: none. Use a brightening concealer one to two shades lighter than foundation, placed in the trough only.
Here is the easiest at-home diagnostic: stand in front of a mirror in natural light and gently pull the under-eye skin sideways toward your temple. If the darkness lightens or disappears, it is vascular or structural (light is no longer trapped in the hollow or passing through the thin skin). If the darkness stays exactly the same, it is pigmented. That ten-second test tells you which corrector family to reach for.
Watch the test in action — and the ingredient picks for each type:
Knowing your type changes both halves of the fix. The rest of this guide is the makeup answer — which corrector to use and how. But I am not only a makeup person, and real under-eye improvement is a skincare problem more than a concealer problem. The right ingredient for your type of dark circle is completely different from your friend's — retinol thickens the skin and fades vascular circles, but does nothing for a structural shadow; vitamin C fades pigmentation, but will not touch capillary darkness. If you want under-eyes that look better without correction six months from now, skip to "How to Actually Treat Dark Circles" at the end of this guide — there is a separate protocol for each of the three types, and matching the right one to your shadow is how you stop fighting the same problem every morning.
Choosing the Right Color Corrector for Your Skin Tone
This is where most people go wrong before they have even opened the tube. The same dark circle on two different skin tones needs two completely different correctors, because the corrector has to be deep enough to neutralize the shadow without going so dark it shows through your concealer as a muddy patch. Light peach on deep skin disappears into nothing. Brick on fair skin looks like a bruise. Match the corrector's intensity to your skin's depth, and match its undertone to the shadow you are canceling. If you are not sure where your skin tone actually falls, our skin undertone guide walks through the wrist test and the jewelry test in two minutes.
Fair to porcelain skin with cool, bluish under-eyes needs a light peach — soft, barely-there warmth that brings the blue back to neutral without overwhelming the surrounding skin. On fair skin with a blue cast, the Bobbi Brown Skin Corrector Stick in Light Peach is the gentlest entry point — pigmented enough to neutralize the shadow but sheer enough that it will not go muddy under concealer.
Light-to-medium skin with blue or blue-purple shadows needs salmon — a touch more pigment and a touch warmer than peach, with enough pink to handle slightly deeper vascularity.
Medium-to-tan skin with blue-grey or purple-brown shadows needs true orange — saturated, warm, and assertive enough to cancel the deeper cool tones you see on olive and golden complexions. For medium-to-tan complexions, a true orange like the L.A. Girl Pro.Conceal in Orange is the move — peach is too pale to cancel the depth of blue shadow on warmer skin, and you will end up reaching for more product than you need.
Tan-to-deep skin with deep brown or purple-brown pigmentation needs red or brick — the pigment looks alarming in the tube and beautiful on the skin, because it perfectly counters the warm-brown shadow without going chalky.
Deep and rich skin with stubborn hyperpigmentation needs dark red or brick with enough depth to neutralize without ghosting the surrounding skin.
And one universal rule: if your under-eye shadow reads more purple than blue or brown, reach for a yellow corrector regardless of your skin depth. Yellow is the direct opposite of purple on the color wheel, and a yellow-toned corrector or a yellow-leaning concealer will neutralize it cleanly where peach or orange will not. If your shadow reads more violet than blue — common on thin or very fair skin and in anyone with broken capillaries — switch from peach to a yellow corrector like the e.l.f. Camo Color Corrector in Yellow and apply only on the darkest violet section, never the whole orbital. Your overall warm vs cool undertone also matters when picking between a peachy-pink and a peachy-orange formula at the same depth — match the corrector's undertone to your skin's.
Fair skin with blue under-eyes
Tap to revealSoft warm peach — just enough pigment to neutralize light vascular blue without looking orange against fair skin.
Light-to-medium skin with blue-purple shadows
Tap to revealWarmer and slightly deeper than peach. Handles vascular shadows with a hint of pink-brown without overwhelming.
Medium-to-tan skin with blue-grey shadows
Tap to revealSaturated warm orange — the only thing strong enough to cancel deep cool tones on olive and golden complexions.
Tan-to-deep skin with brown pigmentation
Tap to revealLooks intense in the tube and perfect on skin. Cancels warm-brown pigmentation without going chalky or ashy.
If you are between two intensities, always go lighter than you think. You can build a second sheer layer in seconds. You cannot un-saturate a corrector once it is on your face without starting over.
How to Apply Color Corrector (Step by Step)
Color correcting is one of those techniques that fails or succeeds in the first thirty seconds. Most of the "color correcting does not work for me" complaints I see online come down to skipping the prep or smothering the application. The whole thing should take less than two minutes, and it goes like this. If you want a deeper primer on how the layers work together, our concealer vs foundation guide covers the why behind every step.
Step 1 — Prep the skin and let it absorb. Apply your eye cream, give it a full one to two minutes to sink in, and only then start makeup. Corrector applied to skin that is still tacky with skincare slides, pills, and creases instantly. If your eye cream feels even slightly slick to the touch, it is not ready yet.
Step 2 — Pick up a tiny amount on the back of your hand. I cannot say this loudly enough. The amount of corrector you need is genuinely smaller than a single grain of rice for both eyes. Tap a dot onto the back of your hand, then warm it with the pad of your ring finger for about five seconds. Warming the product thins it just enough to melt into skin instead of sitting on top.
Step 3 — Press it into the dark area only. Not the whole under-eye. Not the outer corner. Not the cheekbone. Only the actual shadow itself — usually the inner two-thirds of the under-eye, hugging the lash line, ending where the darkness ends. Use a pressing-and-tapping motion with your ring finger. Never swipe. Swiping moves the pigment out of the zone that needs it and onto the skin that does not.
Step 4 — Wait thirty seconds. Let the corrector set into the skin before you touch it again. This is the step everyone skips. A corrector that has had thirty seconds to grip will hold under concealer for hours. A wet corrector that gets concealer slapped on top of it will lift, mix into the concealer, and turn the whole under-eye orange or pink by mid-morning.
Step 5 — Apply a thin layer of concealer on top. Use a concealer one shade lighter than your foundation for brightness — but only a thin, even film. The corrector did the heavy lifting. The concealer is just here to match the corrected zone back to your overall skin tone.
Step 6 — Blend the edges only, never the center. Take a damp beauty sponge and tap, tap, tap around the perimeter of the concealed area to soften the outline. Do not drag the sponge through the middle. Dragging through the center wipes off both the corrector and the concealer you just placed, undoing the entire correction.
Step 7 — Set only if you crease. If you are someone who does not crease at all (lucky you), skip powder entirely. If you do crease, take a small fluffy brush, tap it into a finely milled translucent powder, knock off all the excess on the back of your hand, and press — do not sweep — the lightest possible veil only on the crease-prone area. Finish with a mist of hydrating setting spray to melt the powder into the skin.
The single biggest mistake in color correction is using too much product. A grain of rice is enough for both eyes. If you can still see the corrector color through your concealer, you used too much — wipe it off and start over with half the amount.
Common Mistakes That Make Color Correcting Worse
I have seen every flavor of color correction failure, and they almost always fall into the same six categories. Each one is fixable in under a minute once you know what went wrong. Many of these overlap with broader habits that age the face — for the full list, see our makeup mistakes that age you guide.
Using too much corrector. This is the number one offender. People see a stubborn shadow and react by piling on more pigment, which creates a muddy, opaque patch that fights every concealer you try to put on top of it. The corrector should be sheer enough that you can faintly see your skin through it after blending. If it looks like a solid stripe of orange, that is too much.
Picking the wrong color for your skin tone. Using light peach on tan skin gives you an ashy, grey-blue cast through your concealer. Using brick red on fair skin gives you a bruised, dirty look. Match the corrector's depth to your skin's depth — not just your shadow's color. If your under-eye still looks grey or off after concealer, the corrector was too light. If it looks orange or pink, the corrector was too deep or you used too much.
Blending the entire under-eye. Most blending tutorials show people sweeping a sponge back and forth across the whole eye area, which is exactly what erases the correction. The corrector belongs in a precise zone. Blending only happens at the edges of that zone, never through the center of it.
Skipping concealer over the corrector. Corrector is not concealer. It is a colored pigment designed to be covered. If you stop after applying corrector and walk out the door, you will look like you were punched. Always layer a thin coat of concealer on top to bring the corrected zone back to a neutral skin tone.
Setting too heavily. A heavy dusting of powder over a layered under-eye is the single fastest way to make every fine line and crease show up by lunchtime. Powder catches on the corrector and concealer in any spot that flexes — which is the entire under-eye, all day, every time you smile or talk. Use a feather-light touch, only on the crease-prone area, and only if you actually crease.
Applying corrector to dry, untreated skin. Skipping eye cream guarantees creasing. The under-eye skin is the thinnest, driest skin on your face, and corrector is a pigmented cream that needs something to grip onto. Without a hydrated base, it grabs onto every dry patch and emphasizes it instead of smoothing over it.
If your correction has already gone sideways — muddy, orange, or creased — do not pile more product on. Take a clean damp beauty sponge and gently roll it across the under-eye to lift the excess. Then re-apply a tiny amount of concealer (no corrector this time) and set with the lightest possible powder. You can save the look without starting over.
Pro Tips That Take It From Good to Invisible
These are the small adjustments that separate a correction that "works" from a correction that nobody can see — because the goal is never to see the corrector. The goal is for the shadow to be gone and your skin to look like your skin. For the lift-the-whole-face techniques that pair with a corrected under-eye, our highlighting guide covers placement and product choice.
Warm the corrector on your finger first. Cream correctors are formulated to be slightly stiff in the tube so they do not melt in transit. Tap a tiny amount onto the back of your hand and press your ring finger into it for five seconds before applying. The body heat thins the formula into something that melts into skin instead of sitting on top of it. This single step makes the biggest difference in how invisible the final result looks.
Mix a drop of corrector into your concealer for lazy days. When you do not have time for two layers, place a grain-of-rice amount of corrector directly into a slightly larger blob of concealer on the back of your hand, swirl them together with your ring finger, and apply as one product. You lose a little neutralizing power but gain a one-step under-eye that still corrects color. Perfect for school drop-offs and Mondays.
Brighten the inner corner with pearly highlighter after concealing. A tiny dot of a pearl or champagne shimmer pressed into the very inner corner of the under-eye — right at the tear duct — reflects light back out of the hollow and makes the whole eye area look lifted and awake. Use a fingertip, not a brush, and use less than you think. This is the single move that takes a corrected under-eye from "fine" to "rested."
Use a corrector lipstick or cream blush in a pinch. This sounds absurd until you try it. A warm coral or red-orange lipstick (the cream finish, not the matte) and most warm red-orange cream blushes are made of the same pigment families as color correctors. If you are traveling without your corrector, dab a tiny amount of either onto the back of your hand and use it exactly the same way. The formula is built to wear on the face, so it behaves beautifully on under-eye skin.
Set with a hydrating mist, not powder, if you have mature or dry skin. Powder is not the only setting option. After your concealer is in place, hold a hydrating setting spray about eight inches from your face and mist lightly across the under-eye. The fine droplets melt all the layers together into one cohesive finish that does not crease, does not catch light wrong, and does not emphasize a single fine line. For dry or mature skin, this is genuinely a better finisher than powder.
Brighten on top, not in place of. Once your corrector is set, layer a brightening concealer one to one-and-a-half shades lighter than your skin — the Maybelline Instant Age Rewind Eraser in Fair is the best drugstore option for this because the micro-sponge applicator deposits exactly the right amount to lift the area without burying your correction work.
See it in action — these creators nail the technique:
The Color Correctors I Actually Reach For
Verified picks across every use case — from fair-skin peach to deep-skin brick, with drugstore and prestige options side by side and a multi-shade family pick when one product covers everyone. Plus a yellow corrector for purple shadows and two brightening concealers to layer on top. Every product below has been cross-checked for 4.0+ star reviews on Sephora, Ulta, or Amazon.
A $6 cult favorite with a creamy, thin texture that layers without going chalky. Pat a pinhead-sized dot only on the darkest part of the circle, then blend outward with a ring finger.
The industry-standard corrector stick — twist-up format, balm-like creaminess, and a 4.7-star track record. Warm it with a finger first so it melts in instead of dragging.
Sits in the salmon zone — pinker than pure peach — so it cancels blue shadows on light-medium skin without throwing the area too warm. Apply in a tiny inverted triangle and tap with a damp sponge.
The drugstore corrector makeup artists steal kits with. The orange shade has enough pigment intensity to knock out blue-grey shadows on medium-tan skin in one thin pass.
Becca's legendary peach-apricot formula reborn at Smashbox, with light-reflecting pearls that brighten as they correct. The Medium shade is true peach-orange — ideal for medium and tan complexions.
Sits in the deep red-orange zone that cancels truly dark blue-violet shadows on tan-to-deep skin. The stick format lets you draw a hairline along the orbital bone, then press in with a fingertip.
A true brick-red corrector for deep skin tones — the only shade pigmented enough to neutralize the deepest blue-black shadows without leaving ashiness behind. Backlight pearls add lift, not chalk.
The $5 cult yellow corrector for canceling out the purple cast that thin under-eye skin and broken capillaries cause at any skin depth. Use sparingly — yellow over-applied reads as jaundiced.
The micro-corrector sponge is the secret — load it, twist, then bounce a tiny amount one shade lighter than your skin in an inverted triangle to brighten on top of corrector. Crease-resistant and 12-hour wearing.
A soft-matte finish that diffuses light without going flat. Pick a shade one to one-and-a-half levels lighter than your foundation and pat — never drag — over corrector to lift the eye area.
Five cream correctors (peach, apricot, yellow, green, lavender) plus two finishing powders in one pan. If you correct in more than one zone — under-eyes, redness, sallowness — this is the only palette you need.
Six creamy shades — green, yellow, lavender, peach, brick-orange, and neutral — for $12. The brick-orange shade is the standout for deep skin; the lavender brightens sallow zones around the eyes.
Tarte's cult color-corrector — the one makeup artists reach for when they need to flatten stubborn vascular blueness in one pass. Heavier coverage than a stick format, with peach pigment dense enough to neutralize on its own before concealer goes on top. Also comes in Medium-Tan Peach for deeper complexions.
The widest shade range of any prestige corrector on the market — eight shades from Peach Light through Mango, Papaya, and Lychee, covering fair to deep complexions in one product line. The Peach hero shade pictured is the most universal for vascular dark circles; size up to Mango or Papaya for tan-to-deep tones, or to Cherry Light and Lychee for true red-brick correction.
Frequently Asked Questions About Color Correcting Dark Circles
Warm tones cancel dark circles — specifically peach, orange, and red. Peach works on fair to light-medium skin, orange on tan to olive skin, and brick red on deep skin. The reason: dark circles read cool (blue, purple, or brown), and warm tones sit directly opposite them on the color wheel. Yellow and green correctors do not work on dark circles.
Always before. Apply a pinhead amount of corrector to the darkest part of the circle, tap to blend, wait 30 seconds, then layer a skin-matched concealer on top. The concealer neutralizes the warm orange tone of the corrector so your finished under-eye looks bright and natural, not gray or muddy. Reversing the order defeats the entire point.
Peach for fair to medium skin, orange for tan to olive skin. Purple is the cool opposite of warm orange on the color wheel, so peach and orange neutralize it cleanly. Stay away from yellow correctors — yellow neutralizes redness, not purple. If your peach corrector looks chalky, you need a deeper, more saturated shade matched to your skin depth.
Brown circles need a more pigmented, deeper-toned corrector than vascular ones. Tan skin needs bright orange, deep skin needs brick red or red-orange. Brown pigmentation is denser than blue-purple shadow, so a single sheer layer rarely works — apply one thin layer, set for 30 seconds, then add a second layer only where needed before concealer goes on top.
Yes. Use a warm peach- or orange-toned concealer (one to two shades warmer than your skin) as a hybrid product, or dab a tiny amount of warm orange-red lipstick on the darkest spot, then concealer on top. This is the classic backstage trick for emergencies. It is not as precise as a dedicated corrector but it works in a pinch.
Gray means the corrector is too light for the depth of your circles, or you piled on too much concealer and dulled the warmth. Fix it by sizing up to a more saturated corrector (peach to true peach, or orange to red-orange) and applying concealer in a thin layer only on top of the corrected area, not the entire under-eye.
No. Structural dark circles are shadows cast by a hollow tear trough or bone structure, not pigment. Color theory cannot cancel a shadow. Instead, use a brightening concealer one to two shades lighter than your foundation, applied in an inverted triangle from the inner corner down toward the cheek. This reflects light into the hollow and visually fills it in.
A grain of rice or less for both eyes combined. Color correctors are highly pigmented, and the number one reason corrected under-eyes look cakey or creased is overapplication. Pick up the smallest visible amount on a flat synthetic brush or warm fingertip, tap it only onto the darkest part of the circle, and leave the rest of your under-eye bare.
How to Actually Treat Dark Circles (Beyond Makeup)
Makeup is the same-day answer. If you want under-eyes that look brighter without a corrector in three to six months, you have to treat the root cause — and the protocol is completely different for each of the three types. Using the wrong ingredient on the wrong type is how people spend a year layering retinol onto a structural shadow and seeing zero change. Run the at-home diagnostic from earlier in this guide before you start.
Vascular (Blue/Purple) — Thicken the Skin, Quiet the Vessels
The shadow is capillaries showing through skin that is too thin. The job is to make the skin a more opaque layer over them — slowly.
- Retinol or retinaldehyde at night, three to four times a week, in an eye-safe formula. Retinoids gradually thicken the dermis and build collagen, which makes the capillaries less visible through it. Start at the lowest concentration (around 0.025% retinol or a peptide-retinoid hybrid for the eye area), buffer with moisturizer, and give it a full twelve weeks before you judge results. A clean entry point for the eye area: the Beauty of Joseon Revive Eye Serum (Ginseng + Retinal) — retinal is the higher-potency, lower-irritation form of retinoid that converts to retinoic acid faster than standard retinol, paired with ginseng for capillary support. Skip on nights you use AHAs or strong vitamin C.
- Caffeine eye cream in the morning. Caffeine temporarily constricts the surface capillaries within minutes — same-day softening that pairs beautifully with a peach corrector layered on top.
- Vitamin K and peptides to strengthen capillary walls so they leak less plasma into the surrounding tissue (the leaking is part of what makes the shadow look darker). Look for "phytonadione" or "vitamin K1" on the ingredient list.
- Hydration and sleep matter more here than anywhere else. Vascular shadows respond to lifestyle in days, not months. A dehydrated capillary network swells and reads darker through the skin within twenty-four hours.
Pigmented (Brown) — Brighten the Melanin, Block New Pigment
The shadow is excess melanin sitting in the skin, so the job is to interrupt melanin production and gently fade what is already there.
- Vitamin C (10–20% L-ascorbic acid or a stable derivative like THD ascorbate) every morning. It fades existing pigment and shields the area from new pigment forming when sunlight hits the skin.
- Niacinamide at 5–10% twice daily. It blocks melanin from migrating up to the visible surface of the skin. Stack it with vitamin C — the old "do not layer them" advice is outdated.
- Alpha arbutin, kojic acid, or tranexamic acid for stubborn pigmentation that does not respond to C and niacinamide alone. These interrupt the melanin-producing enzyme directly and are the next step up in potency.
- Tretinoin (prescription) or retinol at night to accelerate cell turnover so pigmented cells shed faster than new ones can form.
- SPF 50 on the under-eye every single day. Non-negotiable. UV is the single biggest driver of pigmentary darkness, and one sunny weekend can undo three months of brightening serum work. A mineral SPF stick or tinted mineral sunscreen layers over the eye area without stinging.
Structural (Shadow) — No Skincare Fix, But Partial Workarounds
A hollow tear trough is bone-and-fat anatomy. No serum will refill it. Be honest with yourself about that before you spend money on the wrong category.
- Hyaluronic-acid eye creams plump the surface enough to soften the hollow for a few hours. It is cosmetic and temporary — but it is the cheapest daily win.
- Gentle lymphatic drainage every morning (inner corner outward with a chilled jade roller, gua sha tool, or just your knuckles) reduces puffiness above the trough, which makes the contrast between the puff and the hollow look less harsh.
- Tear-trough filler is the only true fix. Hyaluronic-acid filler done by a conservative injector who specializes in eyes can erase a structural shadow in twenty minutes. Done badly it causes the Tyndall effect (filler showing up as bluish through the skin), long-term puffiness, or chronic under-eye bags. Choose your injector on their tear-trough portfolio specifically — not their lip work.
The makeup techniques in the rest of this guide work tomorrow morning. The skincare changes above are what give you a face that no longer needs the makeup fix six months from now. The smart move is to do both.
The Bottom Line: Match the Corrector to the Shadow, Not the Skin
Every problem in this guide comes down to one rule: match the corrector to the shadow color, not the skin color. Peach for blue. Orange for blue-grey. Red for purple-brown. Yellow for violet. Once you stop asking "what corrector goes with my skin tone" and start asking "what corrector cancels the color I am actually seeing," the whole process clicks into place.
Use less than you think you need. Set it for thirty seconds before concealer goes on. Blend only the edges. Brighten on top, never instead of. Get those four habits down and your under-eyes will look rested, lifted, and like skin — which is the whole point of color correction in the first place.