You are staring at a grid of 40 foundation shades on a website. They all look the same. You pick one, it arrives, you try it on — and it looks like you smeared clay on your face. Sound familiar? Finding your foundation shade without physically going to a store feels impossible. But here is the truth: with the right method, you can match your foundation shade at home more accurately than most people do at the beauty counter. The beauty counter has fluorescent lighting working against you. At home, you have natural light, time, and zero pressure from a sales associate.
This is not a "five quick tips" article. This is the full masterclass — the same shade-matching system that professional makeup artists use, adapted for your bathroom mirror. By the time you finish reading, you will know your undertone, your depth, exactly where and how to swatch, which digital tools actually work, and how to order foundation online with confidence. No more returns. No more orange face. No more guessing.
Why Store Shade Matching Fails (And Why At-Home Testing Works Better)
Before we get into the method, let me explain why so many people walk out of Sephora with the wrong shade — and why testing at home is actually an advantage. (For the numbers on how big the shade-matching problem actually is across the industry, see our foundation shade-gap study.)
The lighting problem. Department stores and beauty retailers use fluorescent and LED overhead lighting that washes out warm tones and amplifies cool ones. A foundation that looks like a perfect match under those lights can look completely different in daylight, which is where you actually live. At home, you can test next to a window in natural light — the most accurate lighting condition for shade matching.
The pressure problem. A sales associate swatches one shade on your hand, you glance at it for ten seconds, and you buy it. That is not shade matching. That is guessing under social pressure. At home, you can swatch, wait for oxidation, check in multiple lighting conditions, and take your time.
The oxidation problem. Foundation changes color in the first 30–60 minutes after application as solvents evaporate and your skin's oils interact with the formula. In a store, you see the shade for maybe five minutes before you decide. At home, you can test for hours. If you have ever wondered why your foundation turns orange, our deep dive on foundation oxidation explains the exact science — and how to prevent it.
Natural daylight — ideally around 11 AM or 2 PM near a window — is the only reliable light source for judging foundation color. Bathroom vanity lights, ring lights, and store lighting all distort color perception.
Step 1: Identify Your Undertone (The Foundation of Foundation)
Before you even look at a single shade, you need to know your undertone. Depth (how light or dark your skin is) is the easy part — you can see that in a mirror. Undertone is what separates "this shade kind of works" from "this shade disappears into my skin like it was made for me." If you want the full deep dive — including the science of melanin, the olive undertone that most guides miss, and five different identification tests — read our complete skin undertone guide first. Below is the quick version.
There are four undertone categories: warm (yellow, golden, peachy), cool (pink, red, blue), neutral (balanced mix), and olive (green-yellow, often miscategorized as warm). Here are four at-home tests you can do right now:
Look at the veins on the inside of your wrist in natural light.
Works best on lighter skin — on deeper skin tones, veins may be harder to distinguish.
Hold silver and gold jewelry against your bare skin (wrist or collarbone).
This test works across all skin depths.
Hold a plain white piece of paper next to your bare face in natural light.
Neutral skin will not pull strongly in any direction.
Think about how your skin reacts to sun exposure.
A supporting test — use it to confirm your results from the other methods.
Do at least two of these tests. If they agree, you have your answer. If they conflict, you are probably neutral — which is actually great news, because neutral undertones have the widest range of flattering shades.
For a much deeper dive into undertone identification — including the olive undertone, which is frequently miscategorized — read our complete guide on how to find your skin undertone for foundation. It covers everything from the science of melanin to undertone-specific product recommendations.
Watch how pros identify undertones for shade matching:
Step 2: Determine Your Depth Level
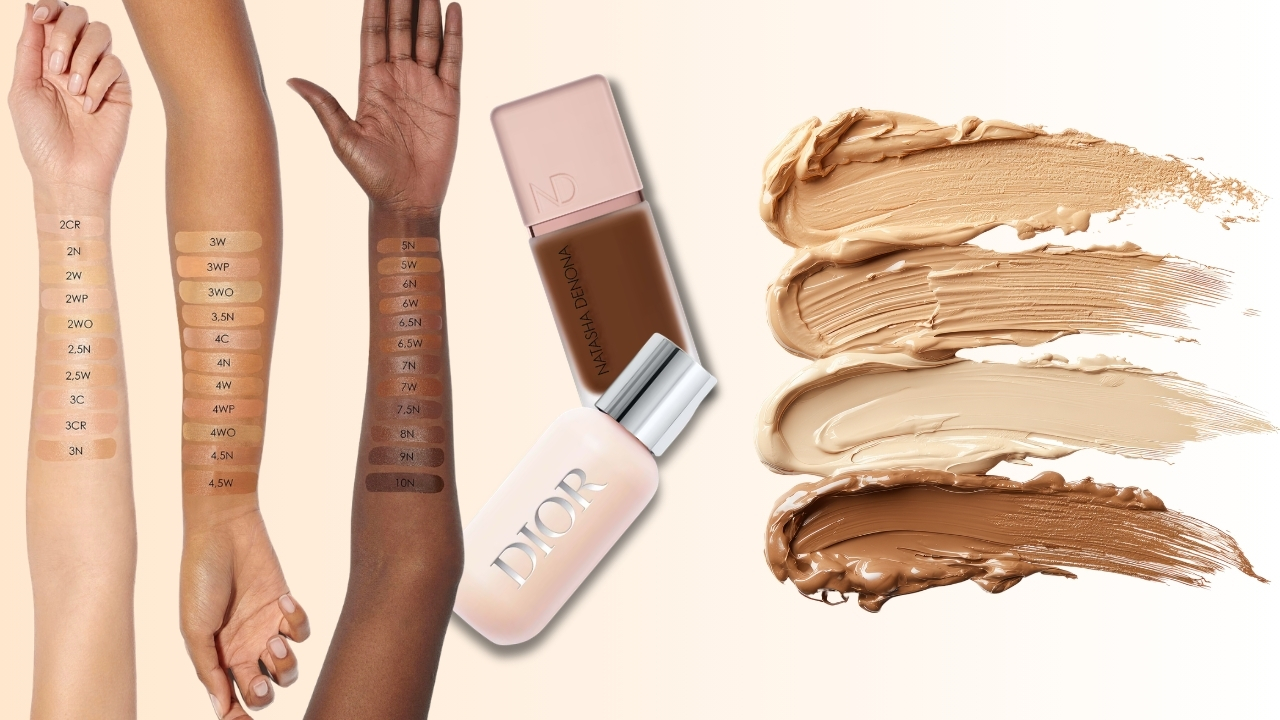
Depth is the lightness or darkness of your skin, independent of undertone. Most foundation lines organize their shades by depth first, then undertone — so knowing both narrows your options from 40+ shades down to 3 or 4.
Look at your bare face in natural light and place yourself on this scale:
Now combine depth + undertone. If you are light-medium with warm undertones, you are looking for shades labeled something like "Light Medium Warm," "3W," "220W," or "Sand Beige." Every brand uses different naming conventions, but the depth + undertone combination is universal.
Pro tip for deeper skin tones: Many brands historically lumped deeper shades together with limited undertone variety. Look for brands that distinguish between warm, cool, and neutral within every depth level. Fenty Beauty's 50-shade range, MAC's NC/NW system, and NARS are strong starting points. The shade code tells you everything: at MAC, "NC" means neutral-cool (actually warm-leaning in MAC's inverted system), and "NW" means neutral-warm (actually cool-leaning). Confusing, I know — but once you find your MAC shade, it becomes a universal reference point.
Step 3: The Three-Stripe Jawline Test (The Pro Technique)
This is the single most important technique in this entire article. It is the method that professional makeup artists use on set, on editorial shoots, and at bridal consultations. And you can do it at home with nothing more than a few foundation samples.
Why the jawline? Your jawline is the bridge between your face and your neck. If a foundation matches your jawline seamlessly, it will blend into both your face and neck without a visible line. Testing on your hand, your wrist, or your inner arm tells you nothing — those areas are a completely different color than your face.
Here is the method, step by step:
1. Start with bare, clean skin. Remove all makeup. Apply your normal moisturizer and let it absorb for 5 minutes. Your skin should be the way it looks on a normal day — not freshly exfoliated, not dehydrated, not flushed from a hot shower.
2. Gather three shades. Based on your depth and undertone assessment, choose three foundation shades that are close to each other — one that you think is your match, one that is half a shade lighter, and one that is half a shade darker. If you are unsure about undertone, pick the same depth in warm, neutral, and cool.
3. Swatch three vertical stripes. Apply a stripe of each shade along your jawline, from the edge of your chin toward your ear. Each stripe should be about one inch wide and directly next to the others, with no gap between them. Use your finger or a flat brush — do not blend yet.
4. Blend only one side. Using a damp beautyblender Original Sponge or clean finger, blend the lower half of each stripe down toward your neck. Leave the upper half unblended as a reference swatch.
5. Step into natural light. Go to a window or step outside. Look at your jawline in a mirror. The correct shade is the one that disappears — the stripe you cannot see. If all three are visible, none of them are right and you need to adjust your depth or undertone range.
6. Wait 20–30 minutes. This is the step almost nobody does — and it is critical. Foundation oxidizes as it interacts with your skin. The shade that looked perfect at minute one might darken by minute thirty. Go make breakfast, check your emails, live your life — then come back and check in natural light again.
7. Take a photo. Use your phone camera (no filters, no beauty mode) in natural light to capture the final result. Photos reveal shade mismatches that your eyes might miss, because you have been staring at your own face and your brain starts compensating.
If you drive, your right side gets more sun exposure through the car window and may be slightly darker or more uneven. The left jawline gives a more consistent baseline for shade testing.
See the jawline test in action from pro makeup artists:
How to Get Foundation Samples Without Going to a Store
The three-stripe test requires actual product on your skin. Here is how to get samples at home:
Order sample sizes. Many brands sell travel-size or sample-size foundations. The Maybelline Fit Me Dewy + Smooth Foundation is around $8 — cheap enough to order two or three shades to test. The Maybelline Fit Me Matte + Poreless Foundation is another budget-friendly option at a similar price point.
Request free samples online. Sephora ships free samples with every online order — add foundation samples to your cart when you buy anything else. Many brand websites (MAC, Clinique, Estee Lauder) offer complimentary samples if you email customer service with your shade inquiry.
Use the decant method. Order from a retailer with a generous return policy. Apply the three-stripe test immediately, and return the product within the return window if the shade is wrong. Ulta and Sephora both accept returns on opened makeup.
Try drugstore first. Drugstore foundations like the Maybelline Fit Me Matte + Poreless Foundation and the L'Oreal True Match Super-Blendable Foundation cost $8–$12 each. Buying three shades to test is still less expensive than one wrong prestige foundation purchase. L'Oreal True Match is especially good for testing because its shade naming system (W for warm, C for cool, N for neutral) makes it crystal clear which undertone you are choosing.
Digital Shade-Matching Tools: What Actually Works
If you already own a foundation shade you love and want to find your match in a different brand, digital tools can save you enormous time. Here is what is out there — and which ones are worth using:
What they do: You enter a foundation shade you already wear, and the tool finds equivalent shades in other brands.
Best tools: Findation.com and our own shade matcher tool are the strongest options. Enter your current shade, and you will get a ranked list of matches across dozens of brands — drugstore through prestige.
Why they work: These tools compare actual shade formulations and community-verified matches, not your face photo. They use data from thousands of real people who have verified shade equivalents across brands.
Best for: Anyone who already has ONE foundation shade that works and wants to find matches in new brands.
What they do: You upload a selfie or use your phone camera, and the AI analyzes your skin tone to recommend shades.
Best tools: L'Oreal's Shade Finder (360-degree selfie analysis), MAC Foundation Finder, and Maybelline's Match Finder use increasingly sophisticated AI. Clarins launched a spectroscopy-powered AI tool in 2026 that claims 96% match accuracy.
Limitation: Your lighting, camera quality, and whether you are wearing any makeup all affect results. Always take the AI suggestion as a starting point, not a final answer.
Best for: Complete beginners who have never worn foundation and need a starting direction.
What they do: You answer questions about your skin (eye color, hair color, sun reaction, vein color, jewelry preference) and the tool suggests a shade.
Best tools: Too Faced, bareMinerals, jane iredale, and L'Oreal Paris all offer quiz-style finders. They work reasonably well for identifying undertone but are less precise on depth.
Limitation: Quizzes rely on self-assessment, which is subjective. If you misjudge your own undertone, the result will be off. They also funnel you toward that brand's products only.
Best for: Narrowing down undertone when you are genuinely unsure and cannot determine it from the at-home tests.
The smartest approach: Use our shade matcher tool to find your cross-brand match from a shade you already own, then order samples of the top 2–3 suggestions, and run the three-stripe jawline test at home. This combines the convenience of digital matching with the accuracy of physical testing.
Watch a creative digital shade-matching method:
The Face vs. Neck Problem: Where Should You Actually Match?
This is one of the most debated questions in makeup — and the answer depends on how different your face and neck are.
If your face and neck are within one shade of each other: Match to your jawline. The jawline bridges both areas and creates a seamless transition. This is the standard approach and works for the vast majority of people.
If your face is noticeably darker than your neck (common for people who spend time outdoors, have hyperpigmentation, or experience melasma): Match to your neck and upper chest. A foundation matched to a darker face will create a visible "mask" effect where your face ends and your neck begins. Matching to the neck means your face will initially look slightly lighter than usual — but the overall effect from any distance is far more natural.
If your neck is darker than your face (less common but happens with some skin conditions and sun exposure patterns): Match to the center of your face and blend downward into the neck, using a bronzer or tinted moisturizer to bridge the transition.
The professional technique: When the face-neck difference is significant, many pros apply foundation matched to the neck on the outer perimeter of the face (jawline, temples, forehead edges) and use a slightly warmer shade on the center of the face. This "dual shade" approach creates a natural-looking dimension without the mask effect.
Custom Blending: The Pro Secret Nobody Talks About
Here is something most people do not realize: professional makeup artists almost never use a single foundation shade straight from the bottle. They custom blend. And you can do the same thing at home — it is simpler than it sounds.
Why blend? Because your perfect shade probably falls between two existing shades. Instead of choosing the "less wrong" option, you mix two shades to create the exact right one.
How to do it:
Buy two adjacent shades
Pick one slightly lighter and one slightly darker than your perceived match, in the same formula. Both must have the correct undertone.
Start with a 1:1 ratio
Dispense one pump of each onto the back of your clean hand or a mixing palette.
Mix thoroughly
Use a spatula or the back of a brush for about 20 seconds until the color is completely uniform with no streaks.
Apply to your jawline
Use the three-stripe test method and check in natural light.
Adjust the ratio
Too light? Add more of the darker shade (try 1:2). Too dark? More of the lighter shade (2:1).
Document your ratio
Write it down once you find your perfect blend.
e.g. "Brand X in shade 220 + shade 230, ratio 2:1"This method also solves the seasonal problem. In summer, shift toward more of the darker shade. In winter, shift toward the lighter one. Same two bottles, adjusted ratio, perfect match year-round.
The L'Oreal True Match Super-Blendable Foundation is ideal for custom blending because its thin, buildable formula mixes smoothly and its clear shade naming system (like W2, C3, N4) makes it easy to choose two adjacent shades with confidence.
Watch pros fix wrong shades with blending and color correcting:
Seasonal Shade Adjustments: Your Year-Round System
Your skin tone changes with the seasons — and your foundation should change with it. Instead of buying entirely new foundations every few months, use this system:
Winter (December–February)
Your skin is at its lightest. Use your lighter shade as the dominant base, or a 3:1 light-to-dark ratio if custom blending. Cool undertones may become more apparent as tan fades. This is the best time to accurately [test your true undertone](/article/how-to-find-skin-undertone).
Summer (June–August)
Skin darkens from sun exposure even with SPF. Shift to your darker shade as the dominant base, or a 1:3 light-to-dark ratio. Humidity also accelerates foundation oxidation — factor in an additional half-shade of darkening. Go lighter than you think.
Spring & Fall
Your skin is between its lightest and darkest. Use a 1:1 ratio of your two shades. Re-test with the jawline method every 3-4 weeks during transitional months, as your depth can shift noticeably in a short window.
Important: Your undertone generally stays the same year-round — only your depth changes. So you do not need different undertone foundations for summer and winter; just different depths within the same undertone family. Our guide on warm vs cool vs neutral undertones explains how undertone affects every product in your routine — not just foundation.
Shade Matching for Deeper Skin Tones: Extra Considerations
Foundation shade matching is harder on melanin-rich skin — not because the process is different, but because the beauty industry has historically offered fewer options and less undertone variety in deeper ranges. Here is what to know:
- Always test on the jawline and wait the full 30 minutes. Undertone errors compound with oxidation on deeper skin, and the orange shift from oxidation is more visible against deeper tones
- Look for brands that offer undertone variety within deep shades. Fenty Beauty distinguishes between warm, cool, and neutral at every depth. MAC's shade range goes deep with clear NC/NW coding. The NARS Natural Radiant Longwear Foundation also has excellent deeper shade variety
- Consider the Monk Skin Tone Scale. The traditional Fitzpatrick Scale (types I–VI) was designed for UV sensitivity, not pigment matching, and it under-represents darker skin tones. The Monk Skin Tone Scale, developed by Harvard sociologist Ellis Monk with Google, uses 10 shades that better represent the global spectrum. Some newer shade-finder tools (like Arbelle AI) are built on this scale
- Go half a shade lighter than your perceived match if you know a formula tends to oxidize — the foundation will darken to your true shade as it settles
See shade matching techniques for different skin tones:
Troubleshooting: What to Do When Your Shade Looks Wrong
You did the tests, you ordered the shades, and something still looks off. Here is your troubleshooting guide:
"My foundation looks orange after a few hours."
Tap for the fixThis is not the wrong shade — it is oxidation. Your skin oils are concentrating the warm pigments in the foundation. Fix it with a silicone primer, setting powder, and by going half a shade lighter. Read the full science and prevention routine in our foundation oxidation guide.
"My foundation looks gray or ashy on my skin."
Tap for the fixAn ashy or grayish cast means the foundation is too cool (too much pink) for your skin. Switch to a warmer undertone in the same depth. If you have olive undertones, look for foundations specifically formulated for olive skin — our olive skin foundation guide covers brands that get this right. Standard "warm" and "cool" may both look wrong.
"My foundation looks like a mask — I can see where it starts and stops."
Tap for the fixThe foundation is either too light or too dark for your skin. If you can see a clear line at your jawline, the depth is off. Re-do the three-stripe test with shades that are closer to your neck color. And always blend foundation down onto your neck — stopping at the jawline guarantees a visible edge.
"My foundation looks too yellow or too pink."
Tap for the fixToo yellow = the foundation is too warm for you; try neutral or cool. Too pink = the foundation is too cool; try neutral or warm. Neutral undertone foundations are the safest bet when you are unsure. A proper undertone assessment will prevent this entirely.
Other common issues:
- "It looked right in the store but wrong at home" — This is the lighting problem. Store lighting flatters everything. Always re-test at home in natural light before committing. This is exactly why at-home testing is superior — and why knowing your undertone in advance prevents expensive mistakes.
- "The shade is right but it looks cakey/patchy" — This is a formula problem, not a shade problem. Try a different formula — our foundation finishes guide explains which finish works best for each skin type. A damp sponge gives the shearest, most skin-like application.
- "My foundation looks different on different days" — Your skin changes based on hydration, hormones, sleep, and diet. If you notice significant variation, custom blending two shades gives you the flexibility to adjust on the fly.
The Complete At-Home Shade Testing Checklist
Here is your step-by-step action plan, start to finish:
🔍 Identify your undertone
Use at least two of the four at-home tests (vein, jewelry, white paper, sun reaction) — or follow our complete undertone guide for all five tests.
🎚️ Determine your depth
Fair, light, medium, or deep — look at bare skin in natural light.
🧰 Use our shade matcher tool
Find cross-brand shade recommendations based on any foundation you have previously worn — or use the quiz-based finders if you are a complete beginner.
🛒 Order 2–3 sample shades
Pick shades in your depth + undertone range. Budget-friendly drugstore foundations work perfectly for testing.
✋ Run the three-stripe jawline test
Apply on bare, moisturized skin and check in natural light.
⏱️ Wait 30 minutes
Let the foundation oxidize, then re-check in natural light and take a photo.
🎨 Custom blend if needed
The perfect shade is often between two existing shades.
📝 Document your matches
Save a note with brand, shade name, shade code, and any blending ratios so you never have to redo this process.
Test Your Foundation Shade Matching IQ
5 questions. Can you pass the shade-matching masterclass?
Frequently Asked Questions About Testing Foundation Shade at Home
Your undertone is the single most important factor in shade matching — more important than depth. Use at least two of these at-home tests: the vein test (wrist veins in natural light), the jewelry test (silver vs gold), the white paper test, and the sun reaction test. If the results conflict, you are likely neutral. For the full five-test method — including how to identify olive undertones, which most guides miss — read our complete undertone identification guide.
Match to your jawline, which bridges your face and neck. If your face and neck are significantly different in color, match to your neck and upper chest — this prevents the "mask" look where foundation creates a visible line. Always blend downward past the jawline.
Yes. Use a cross-brand shade matching tool like our shade matcher to find your match based on a shade you already own, order 2-3 sample shades, and run the three-stripe jawline test at home in natural light. This method is actually more accurate than in-store matching because you test in real-world lighting conditions.
Wait at least 20–30 minutes. Foundation oxidizes as solvents evaporate and your skin's oils interact with the formula, which can darken the shade noticeably. The color typically stabilizes between 30–60 minutes. If you judge the shade immediately, you may pick a shade that ends up too dark after it settles.
Store lighting is typically fluorescent or LED, which washes out warm tones and amplifies cool ones. This distorts how foundation appears on your skin. Natural daylight is the only reliable lighting for shade matching because it represents how you actually look in the real world. Always re-test any store purchase at home near a window.
Several apps and tools exist: L'Oreal and Maybelline offer AI selfie-based shade finders, quiz-based tools are available from most major brands, and cross-brand matchers like Findation.com and our shade matcher let you find equivalents from a shade you already know. AI tools are a good starting point, but always verify with a physical swatch test for the most accurate result.
Yes. Most people are 1-2 shades darker in summer than winter due to sun exposure. The easiest approach is to own two adjacent shades and custom blend them in different ratios throughout the year — heavier on the lighter shade in winter, heavier on the darker shade in summer. Your undertone stays the same; only the depth changes.
The Bottom Line: Your Foundation Should Be Invisible
Finding your perfect foundation shade at home is not just possible — it is the superior method. You have natural light, you have time to wait for oxidation, and you have zero pressure to buy on the spot. The three-stripe jawline test, combined with a digital shade matcher to narrow your options, gives you the same results a professional makeup artist achieves — minus the $200 consultation fee.
Start by identifying your undertone, then use our shade matcher tool to find your cross-brand match, order samples of the top suggestions, run the jawline test, and document your results. Do this once thoroughly, and you will never have to guess your foundation shade again.
Once you have your foundation shade locked in, the next question is usually concealer — and the shade rules are completely different. Our concealer vs foundation guide explains when to go lighter, when to match exactly, and how to use both together.
The right foundation does not sit on your skin — it disappears into it. Now you know exactly how to find it.