Highlighting is the technique that turns a flat, matte makeup application into a luminous, three-dimensional face — and it takes less than sixty seconds once you know where to place it. Whether you have never touched a highlighter or you have been swiping shimmer on your cheekbones for years and wondering why it looks more greasy than glowy, this tutorial covers everything: the science behind why highlighting works, the exact placement zones, adaptations for every face shape, the powder vs cream vs liquid debate, pro MUA methods from Nam Vo to Patrick Ta, and every mistake that separates a blinding stripe from a lit-from-within glow. Every technique in this guide comes straight from years of sculpting faces in the chair and studying the artists who define modern beauty.
What Is Highlighting (and How It Actually Works)
Highlighting is the art of using light-reflecting products on the high points of your face — the areas where light naturally hits — to create the illusion of lifted, luminous, healthy skin. Where contouring uses shadow to make areas recede, highlighting uses light to make areas advance. Together, they are the two halves of facial dimension. But highlighting can stand entirely on its own — a technique called strobing — and produce a stunning result with half the products and half the effort.
The science is straightforward. Highlighters contain finely milled mineral particles — primarily mica — that interact with light in two ways. First, they reflect light off flat particle surfaces, creating bright points. Second, they scatter light in multiple directions across the skin, producing a diffused, luminous glow. The fineness of the milling determines the finish: particles under 20 microns produce an elegant satin sheen, 20 to 75 microns deliver standard shimmer, and anything above 75 microns enters glitter territory. Pearlescent pigments — mica coated with titanium dioxide — reflect light in different directions simultaneously, creating the multidimensional "lit-from-within" effect that makes a great highlighter look like actual skin radiance rather than a metallic stripe.
This is why placement matters more than product. A ten-dollar drugstore highlighter in the right spot will always look better than a luxury formula in the wrong one.
— Nam Vo, celebrity makeup artist known as "The Dewy Dumpling Queen." Her philosophy: the glow starts with skincare and layering — the highlighter is just the final punctuation mark.
Where to Apply Highlighter: The 7 Key Zones
This is the map. Every face has the same high points where light naturally lands — and these are exactly where your highlighter goes. Think of it as strategic light placement, not decoration.
Zone 1: Cheekbones (the most important zone). This is where most people start and stop — and for good reason. Apply highlighter to the very top of your cheekbones, starting from the highest point (directly below the outer corner of your eye) and sweeping back toward the temple. Keep the stripe narrow and high. If you place it too low, you will look oily rather than sculpted.
Zone 2: Bridge of the nose. A thin line down the center of the nose bridge creates the illusion of a narrower, more refined nose. Start between the eyebrows and stop halfway down — never bring it to the tip unless you want to draw attention there. If your nose has a bump you would rather minimize, skip this zone entirely. Mario Dedivanovic's rule: avoid highlighting the bridge if there is a bump, because it draws attention directly to it.
Zone 3: Cupid's bow. A tiny dab on the V above your upper lip makes lips appear fuller and more defined. This is the most underrated highlight zone — it catches light beautifully in photos and in person.
Zone 4: Brow bone. Apply just below the arch of your eyebrow, right on the brow bone. This lifts the eye area and makes brows appear more sculpted. Use a matte or satin highlight here — visible shimmer on the brow bone can look dated.
Zone 5: Inner corners of the eyes. A small touch of highlighter at the inner corner of each eye instantly brightens the entire face and makes eyes appear larger and more awake. Use your ring finger or a small precision brush. For fair skin, use champagne or pale pink. For medium or olive skin, gold or peach. For deep skin, bronze or copper.
Zone 6: Center of the forehead. A small, blended circle in the center of the forehead creates a soft glow that makes the face look more dimensional. Keep it concentrated and well-blended — too much here reads as a shiny forehead.
Zone 7: Center of the chin. A whisper of highlighter on the chin completes the vertical light map of the face. This is especially effective for balancing heart-shaped faces where the chin is narrower than the forehead.
For evening events, weddings, or anytime your decolletage is exposed, sweep highlighter along your collarbones and the tops of your shoulders. Use a liquid or cream formula and blend with your hands for a natural, sun-kissed glow. This catches light beautifully in photographs.
A lesser-known runway trick — apply liquid highlighter in a straight line down the center of your shins for legs that look longer and more toned. Blend outward gently. This works especially well with skirts, dresses, and shorts.
Watch how the pros map their highlight placement:
Choosing the Right Highlighter Formula
The formula you choose matters more than the brand, and the right choice depends entirely on your skin type and the finish you want. Here is the honest breakdown.
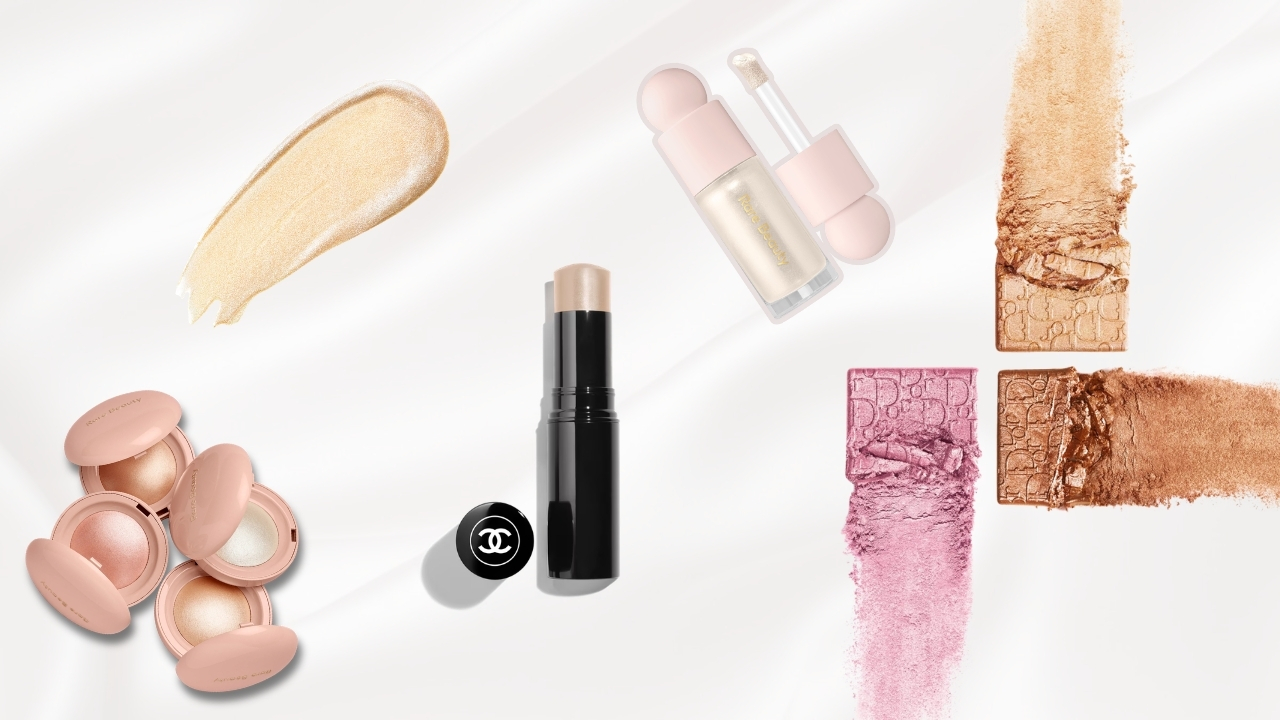
Powder Highlighter
The most common format and the easiest to control. Powder delivers the strongest concentration of shimmer pigment per swipe, lasts the longest on skin, and is the least likely to turn greasy. The tradeoff: it can emphasize texture, dry patches, and pores if you apply too much or skip moisturizer. Powder highlighters come in three subtypes — pressed (smooth, compact), baked (softer, more velvety, can be applied wet for intense foil-like payoff or dry for a sheer glow), and loose (finest texture, most natural). Best for oily and combination skin.
The Best Powder Highlighters at Every Price 💎
Every powder here earns its spot, from drugstore to backstage-grade luxury.
Gorgeous wet-or-dry payoff for under five dollars. Baked formula buffs on sheer or layers for foil-like intensity.
Light-reflecting pearls in a silky pressed formula. Excellent drugstore option that punches well above its price.
Silky soft pressed powder with an intense radiant glow that rivals highlighters three times the price. Vegan and cruelty-free — one of the best-kept secrets in the drugstore aisle.
Intensely pigmented pressed powder that delivers a high-impact dewy finish. The marbled swirl gives a multi-tonal glow that looks far more expensive than it is.
Golden-pearl pressed powder with a warm champagne shift. Reads as a natural bronze-glow rather than cool shimmer — flatters medium to tan skin beautifully.
The powder counterpart to the liquid version below. Silky, glass-like sheen that melts into skin without sitting on top of texture.
The iconic Becca formula now kept alive by Smashbox. Ultra-buttery liquid-to-powder finish that remains the standard other highlighters are measured against.
Professional-grade quad with four intermixable highlight shades. Backstage MUAs use it because the finely milled texture layers over foundation without disturbing it.
Single-shade pressed powder with an intensely pigmented, wet-look foil finish that photographs beautifully.
Soft-focus, light-reflecting technology creates a candlelit glow without any visible glitter. Doubles as a finishing powder and subtle all-over highlighter.
Cream Highlighter
Melts into the skin for the most natural, "lit-from-within" finish. Blends beautifully, builds gradually, and works brilliantly for Mary Phillips' underpainting technique (applying highlight under foundation). The downside: it can slide on oily skin and has a shorter wear time without setting. Best for dry to normal skin.
The Best Cream and Balm Highlighters 🫧
The most natural, skin-like glow — perfect for the "no makeup" makeup look.
Cushion-tip applicator makes precise application effortless. One click dispenses the perfect amount for both cheekbones.
Unique gel-to-powder formula infused with fermented arnica. Starts creamy on application and sets to a luminous powder finish — the blendability of a cream with the lasting power of a powder.
Transparent balm that adds a dewy, glass-skin sheen without any visible shimmer particles. Looks like your actual skin is glowing — layers beautifully over or under foundation.
Doubles as a hydrating primer and liquid highlighter with Vitamin C and squalane for true glass skin.
Liquid Highlighter
The most versatile format. You can wear it alone on the high points, mix it into foundation for an all-over glow, or blend it into moisturizer as a luminous base.
The Best Liquid Highlighters 💧
Mix into foundation for all-over glow, or dab directly onto high points.
Layers over any formula without disturbing makeup underneath. Buildable from a subtle sheen to a full glow.
Brilliant budget option that works mixed into foundation or applied directly to high points.
See every Sephora highlighter tested back to back:
How to Choose Your Highlighter Shade
The wrong shade is the fastest way to make highlighting look unnatural. Your highlighter should enhance your natural luminosity — not look like a metallic stripe painted on your face. Here is the shade-matching framework.
Fair skin: Icy pink, pearl, soft champagne, and iridescent white tones. Avoid anything too golden or bronze — it will look muddy on fair skin. The goal is a delicate, moonlit glow.
Light to medium skin: Champagne, rose gold, and soft gold. These warm-neutral tones catch light beautifully without overwhelming lighter complexions. Rose gold is the universal crowd-pleaser in this range.
Medium to olive skin: True gold, warm champagne, and peach tones. Gold-based highlighters are stunning on olive undertones because they harmonize with the natural warmth in the skin.
Tan skin: Rich gold, warm bronze, and copper tones. Avoid anything too pale or silvery — it will look ashy. The glow should look like sun is hitting your skin from within.
Deep skin: Bronze, copper, rich gold, and warm rose tones. Silver and icy shades can create a grayish, ashy cast on deeper skin tones. The theBalm Mary-Lou Manizer is a gorgeous honey-gold that works across a wide range of deeper skin tones. The MAC Mineralize Skinfinish in Soft and Gentle is another excellent option — its slow-baked 77-mineral formula buffs on beautifully on deep complexions.
The undertone rule: Match your highlighter's base tone to your skin's undertone. Cool undertones (pink, blue) work best with pearl, icy pink, and silver-based highlighters. Warm undertones (yellow, golden) work best with gold, bronze, and peach-based highlighters. Neutral undertones can go either direction — champagne and rose gold are your safest bets.
Step-by-Step: How to Highlight Your Face
This is the core technique. Master these seven steps and every variation — by face shape, by formula, by occasion — becomes a simple modification rather than a new skill.
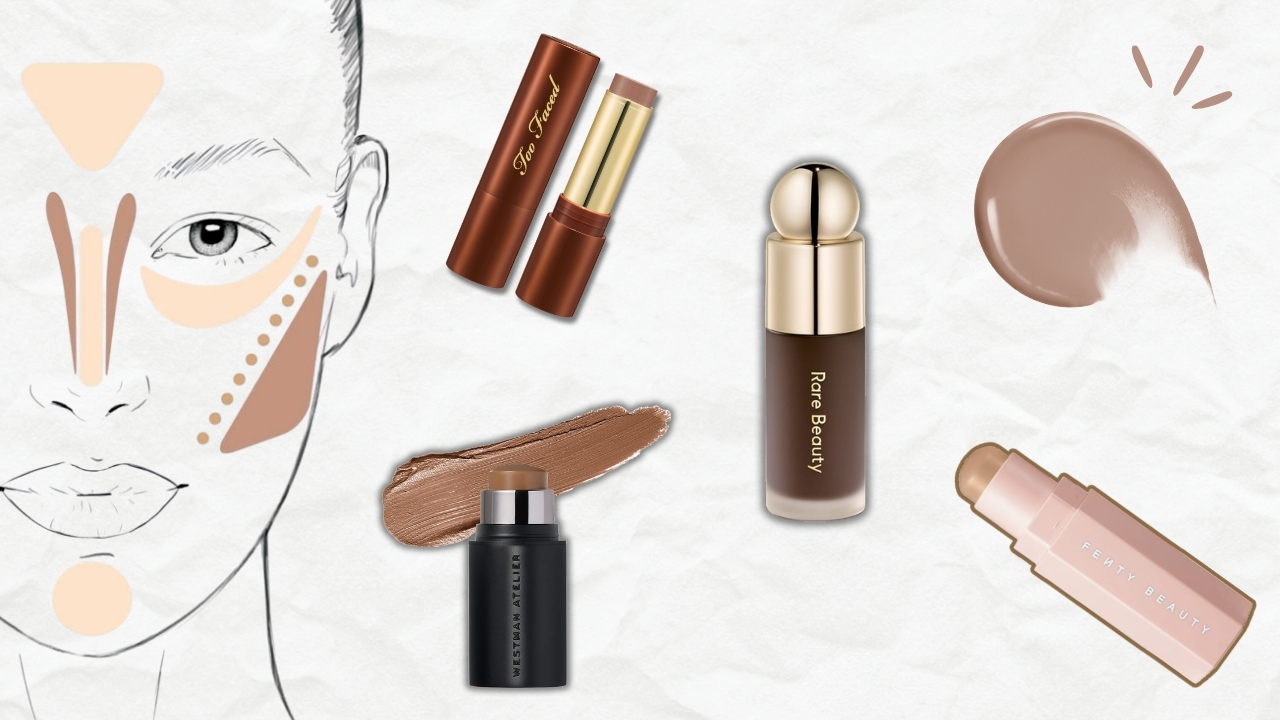
Step 1: Prep your canvas. Highlighting amplifies everything it touches — including dry patches, texture, and flaky skin. Make sure your skin is properly moisturized before you start. Apply your primer and let it set. Then apply your full base: foundation, concealer, contour, and blush. Highlighting is the final face step before setting.
Step 2: Choose your tool. For powder highlighter, use a fan brush — the Real Techniques Sheer Radiance Fan Brush is designed specifically for this. Hold it flat against the product, pressing the side of the bristles down to coat them, then sweep lightly across your skin. The fan shape deposits a sheer, diffused layer that builds gradually without dumping too much product at once. For cream or liquid highlighter, use your ring finger (the warmth from your skin melts the product for seamless blending) or a damp Beautyblender sponge with a pressing, stippling motion.
Step 3: Start with the cheekbones. Apply highlighter to the highest point of each cheekbone — the ridge directly below the outer corner of your eye — and sweep backward toward the temple. Keep the line narrow. Think of it as tracing the top edge of your cheekbone, not painting a wide band. This is the C-shape technique that Nam Vo made famous: cheekbone sweeping upward into the temple for a lifted, sculpted glow.
Step 4: Hit the bridge of your nose. Draw a thin line down the center of the nose bridge, starting between the eyebrows and stopping about halfway down. Use a light hand — one gentle swipe is usually enough. Skip this step entirely if you want to minimize attention to the nose area.
Step 5: Accent the small zones. Dab a tiny amount on your Cupid's bow, the brow bone just below each eyebrow arch, the inner corners of your eyes, a small circle on the center of your forehead, and a whisper on the center of your chin. These accent zones use very little product — less than half of what you used on your cheekbones.
Step 6: Blend everything. Use a clean fluffy brush, your fingertip, or a damp sponge to diffuse any harsh edges. The highlighter should melt into your skin with no visible starting or stopping points. Charlotte Tilbury says the same thing about highlight that she says about contour: if you can see where it starts and stops, you have not blended enough.
Step 7: Set and finish. Lock everything in place with a light misting of setting spray — the Charlotte Tilbury Airbrush Flawless Setting Spray is excellent for this. Hold the bottle eight to ten inches from your face and spray in an X pattern. This prevents your highlighter from migrating, fading, or transferring throughout the day. If you used cream highlighter and have oily skin, use Nam Vo's precision powdering trick: take a small rounded eyeshadow brush and powder only your oily hot spots (T-zone and sides of the nose), leaving the rest of the face dewy.
See the full technique in action — these creators demonstrate each step beautifully:
How to Highlight by Face Shape
The seven zones above are your default map — but highlight placement shifts based on your face shape. The goal is never to make every face look the same. It is to use light strategically to enhance the structure you already have.
The goal: Create vertical emphasis to elongate the face and draw attention upward rather than outward. Round faces have similar width and length with the cheekbones as the widest point.
Highlight placement: Apply slightly higher on the cheekbones than usual, blending UPWARD toward the temples rather than outward. Add a thin line down the center of the nose for subtle lengthening. Center of forehead and center of chin to create a strong vertical light axis.
Where to avoid: The apples of the cheeks — highlighter here adds width, which is the opposite of what you want.
Pro tip: Pair this highlight placement with the "number 3" contour to maximize the elongating effect. The vertical light draws the eye up and down rather than side to side.
The goal: Enhance what is already balanced. Oval faces are naturally proportionate — the forehead is slightly wider than the chin with a gentle narrowing at the jawline.
Highlight placement: Standard high-point highlighting works perfectly. Tops of cheekbones, bridge of nose, touch on Cupid's bow, small sweep on brow bone. This face shape needs the least modification.
Where to avoid: No major restrictions — just don't overdo it. The balanced proportions need enhancement, not correction.
Pro tip: Focus more on highlight than contour. Oval faces benefit most from luminosity rather than reshaping.
The goal: Soften angular features by adding curved light that draws attention away from the strong jawline. Square faces have the forehead, cheekbones, and jaw at roughly equal width.
Highlight placement: Apply to the tops of cheekbones in a CURVED C-shape motion from cheekbone sweeping to temple. Gentle touch on the center of forehead and center of chin. Focus on rounded, curved light placement.
Where to avoid: Do not highlight along the jawline or temples in straight lines — this reinforces the angular structure you are trying to soften.
Pro tip: Use a cream or liquid formula for softer edges. The dewy finish reads as more organic and curved than the precise lines a powder can create.
The goal: Balance the wider forehead against the narrower chin. Heart-shaped faces (inverted triangle) have a broad forehead tapering to a pointed chin.
Highlight placement: Tops of cheekbones, slightly under the brow arch. Add a deliberate touch to the CHIN — this creates visual symmetry with the wider forehead by drawing light and attention to the lower face.
Where to avoid: Over-highlighting the forehead — it is already the widest part, and adding more light there makes the imbalance more pronounced.
Pro tip: Highlighting the chin is the single most important adjustment for heart-shaped faces. It visually "fills out" the lower face and creates balance.
The goal: Create the illusion of width to make the face appear shorter and more balanced. Oblong faces are longer than they are wide with a roughly even width from forehead to jaw.
Highlight placement: Apply to the apples of the cheeks, blending OUTWARD horizontally. This is one of the few face shapes where horizontal highlight placement is ideal. Focus on widening rather than lengthening.
Where to avoid: Long vertical lines down the nose (emphasizes length). Avoid highlighting the center of the forehead or chin — both add more vertical length.
Pro tip: Keep all highlight strokes horizontal. Think "across" rather than "up and down." This optically shortens the face.
The goal: Balance the naturally prominent cheekbones with brightness on the narrower forehead and chin. Diamond faces have cheekbones as the widest feature with a narrow forehead and chin.
Highlight placement: Center of forehead and tip of chin to widen these narrower areas. Under the eyes and inner corners to brighten. Only a whisper of highlight on the very highest point of the cheekbones.
Where to avoid: Heavy highlight on the cheekbones — they are already the widest feature, and adding more light there exaggerates the width. Avoid glitter-based highlighters; use light-reflective satin formulas instead.
Pro tip: The forehead and chin are your main highlight targets, not the cheekbones. This reverses the default approach for a face shape that needs it.
Pro MUA Techniques Worth Stealing
The best makeup artists in the world each have a signature approach to highlighting. Here are four techniques you can adapt for yourself — from beginner-friendly to advanced.
Patrick Ta's Cream-Over-Powder Method
Patrick Ta reverses conventional wisdom by applying cream highlighter on top of powder highlighter. Most of us were taught to always put powder over cream — but Ta's technique creates a multidimensional, glossy glow with serious lasting power. Apply powder highlighter to your cheekbones first with a fluffy brush for shimmer impact. Then press cream highlighter directly on top with a dense brush or sponge for a fresh, dewy dimension. The cream base grabs the powder particles and creates a richness that neither formula achieves alone. His Patrick Ta Major Headlines Double-Take Creme and Powder Duo was designed specifically for this layering technique.
Nam Vo's "Dewy Dumpling" Layering
Nam Vo — the artist behind Rosie Huntington-Whiteley's and Emily Ratajkowski's luminous skin — builds glow in layers long before the highlighter even comes out. She starts with a hydrating primer, then applies foundation, then mixes illuminating drops with bronzer for dimension, and only then adds cream highlighter followed by powder highlighter over the top with a round fluffy brush. Her "burnt toast" philosophy: the face should be light in the center and gradually darker around the perimeter. The critical finishing step is her precision powdering technique — using a small rounded eyeshadow brush to powder only the T-zone and sides of the nose, leaving every other area dewy and glowing.
Mary Phillips' Underpainting Method
Mary Phillips — the artist behind Jennifer Lopez's and Hailey Bieber's camera-ready glow — applies highlight underneath foundation instead of on top. She calls it "underpainting": the contour and highlight are the bones, and the foundation is the skin that goes over them. Apply cream highlight to all your high points (between the eyebrows, down the nose bridge, under the eyes, underneath the cheek contour, under the lower lip), then apply a light layer of foundation over everything. The foundation acts as a softening filter — the highlight reads as natural luminosity coming from within the skin rather than product sitting on top. This is the best technique for anyone who wants glow without visible shimmer.
Mario Dedivanovic's Strategic Placement
Mario Dedivanovic — Kim Kardashian's makeup artist — uses asymmetric highlight placement designed for movement. He applies highlight above the brow bone, on one side of the chin, and on the same side of the forehead, so when a person moves through a room or on a red carpet, light catches different planes at different moments. His critical rules: when highlighting the forehead and chin, use a non-shimmer product first or it looks shiny and greasy. Never go near laugh lines with highlighter. And always remember — the goal should be dimension, not a defined stripe.
Watch the pros execute these techniques:
Strobing: The Highlight-Only Technique
Strobing is highlighting taken to its logical extreme — a full-face technique that uses only light-reflecting products and zero contour or bronzer. Named after the strobe lights that flash evenly and create a camera-flash effect, strobing enhances all your high points to create a fresh, youthful, dimensional face with a dewy finish and a fraction of the product load.
The technique is simple: apply highlighter to all seven zones (cheekbones, nose bridge, Cupid's bow, brow bone, inner corners, forehead center, chin) with slightly more intensity than you would for standard highlighting. Because there is no contour to create contrast, the glow itself becomes the structure. Strobing is more beginner-friendly than contouring, more forgiving of imperfect placement, and perfectly suited for the "no-makeup makeup" and "clean girl" aesthetics that dominate current beauty trends.
Who should try strobing: Anyone who wants a quick, luminous look without the sculpting commitment. It is especially flattering on younger skin and works beautifully for daytime, outdoor events, and video calls where heavy contouring can look overdone.
Who should pair it with contour instead: If you want more dramatic structure or are going to be photographed in studio lighting, the contour-plus-highlight combination gives you more control over dimension. Read the companion article — How to Contour Your Face: The Complete Tutorial — for the full contouring masterclass, then combine both techniques for maximum impact.
"Highlighter makes oily skin look even oilier — you should skip it entirely."
Tap to revealOily skin can absolutely wear highlighter — you just need powder formula, precise placement on the cheekbones only (avoiding the T-zone), and a matte setting spray. The key is keeping it away from areas that naturally produce oil.
"You should apply highlighter after every other face product is complete."
Tap to revealIn the standard application order, highlighting is the final face step before setting spray. However, Mary Phillips' underpainting technique applies it under foundation for a more natural glow — both approaches are valid.
"Shimmer highlighter is the only way to get a visible glow."
Tap to revealSatin and dewy-finish highlighters create a beautiful "lit-from-within" glow without any visible shimmer particles. Cream formulas, illuminating primers, and even facial oils can create luminosity that reads as healthy skin rather than makeup.
"Highlighter emphasizes pores and skin texture."
Tap to revealShimmer particles do amplify texture — they catch light in pores and on dry patches. The fix: prep skin thoroughly with moisturizer, use a primer that blurs pores, choose a satin or cream formula over chunky shimmer, and avoid applying directly over textured areas.
🚫 The 8 Highlighter Mistakes That Make You Look Oily Instead of Glowy
Knowing what NOT to do is just as important as knowing the technique. These are the mistakes I see most often — and the fix for each one.
Mistake 1: Using too much product. This is the number one error. A heavy hand turns "glow" into "sweaty forehead" in one swipe. The fix: start with the smallest amount you think you need, then cut it in half. You can always build up — you cannot easily take away.
Mistake 2: Wrong placement. Applying highlighter where shadows should be — below the cheekbones, on the sides of the nose — instead of the high points where light naturally hits. The fix: re-read the 7 zones above and stick to them religiously until placement becomes muscle memory.
Mistake 3: Wrong shade for your skin tone. Using a cool-toned silver highlighter on warm skin (or a warm gold on cool skin) creates an ashy, gray, or disconnected look. The fix: match your highlighter's base tone to your undertone, always.
Mistake 4: Applying to unprepared skin. Highlighter amplifies everything — including dry patches, flaky skin, enlarged pores, and acne texture. The fix: moisturize thoroughly, use a pore-blurring primer, and consider a satin or cream formula over chunky shimmer if your skin has texture.
Mistake 5: Wrong tool for the formula. Using a dense foundation brush for powder highlighter (deposits too much) or a dry brush for cream (drags and streaks). The fix: fan brush for powder, fingers or damp sponge for cream, fingers or sponge for liquid.
Mistake 6: Not blending enough. Leaving visible streaks or a harsh line of shimmer instead of diffusing the glow into the skin. The fix: after applying, take a clean fluffy brush or damp sponge and blend the edges until there is no visible start or stop point.
Mistake 7: Highlighting near laugh lines. Mario Dedivanovic's critical rule — shimmer settles into and emphasizes fine lines. The fix: keep highlighter away from the nasolabial folds, crow's feet, and any expression lines. These areas need matte concealer, not shimmer.
Mistake 8: Ignoring lighting conditions. A highlighter that looks subtle in bathroom lighting can read as a blinding metallic stripe in direct sunlight or flash photography. The fix: check your highlight in natural daylight before leaving the house. For events with flash photography, choose a finely milled satin formula over a chunky metallic one.
It happens to literally everyone. Grab a clean fluffy brush or a damp sponge and buff the edges until the glow blends into your skin. If it is still too intense, press a tissue lightly over the area or dust a thin layer of translucent powder on top to dial it back. Crisis averted.
Nam Vo built an entire career on the belief that more glow is always the answer. If it makes you feel beautiful, blind them. ✨
🧠 Test Your Highlighting IQ
Test Your Highlighting IQ
5 questions. How well do you really know this stuff?
💬 Frequently Asked Questions About Face Highlighting
In the standard routine, highlighter goes on after foundation, concealer, contour, and blush — it is the final face step before setting spray. However, Mary Phillips' underpainting technique applies cream highlight under foundation for a more natural, skin-like glow. Both approaches are valid; the standard method gives more visible shimmer while underpainting gives a softer, lit-from-within effect.
Avoid applying highlighter near laugh lines (nasolabial folds), crow's feet, or any expression lines — shimmer settles into creases and emphasizes them. Also avoid the sides of the nose (it makes it look wider), areas with active breakouts or visible texture (shimmer amplifies imperfections), and the T-zone if you have oily skin (it will look greasy instead of glowy).
A baked powder highlighter is the most beginner-friendly because it offers the most control — you can build gradually without overdoing it. Apply it dry for a sheer glow or slightly dampen your brush for more intensity. Cream sticks are also beginner-friendly because you can apply directly and blend with your finger. Avoid loose powder highlighters as a first product — they create more fallout and are harder to control.
Absolutely. Choose a powder formula (not cream or liquid), apply only to the cheekbones and brow bone (avoiding the T-zone entirely), use a light hand, and set with a matte setting spray. The key is keeping shimmer away from areas that naturally produce oil — your cheekbones are not oily, so highlighter there reads as glow rather than grease.
Contouring uses both dark products (to create shadow and make areas recede) and light products (to highlight and make areas advance) to sculpt facial structure. Strobing uses only highlighting products — no bronzer, no contour shade. It creates dimension purely through light reflection, making it simpler, faster, more beginner-friendly, and perfectly suited for the natural "clean girl" aesthetic.
Shimmer particles can amplify texture by catching light inside pores and on dry patches. The solution is threefold: prep skin thoroughly with moisturizer and a pore-blurring primer, choose a satin or cream formula over chunky metallic shimmer, and apply to the tops of your cheekbones (where skin tends to be smoother) rather than areas with visible pores like the nose or lower cheeks.
The Bottom Line: Light Is Your Most Powerful Makeup Tool
Highlighting is the single fastest way to make any makeup application look more polished, dimensional, and alive. You do not need expensive products or advanced skills — you need the right placement and a light hand. Start with your cheekbones and one affordable powder highlighter. Master the basic seven zones. Then experiment with the pro techniques — layering cream under powder for intensity, trying the underpainting method for invisible glow, or going full strobing for a fresh daytime face. The difference between "shiny" and "glowing" is not the product — it is where you put it and how much you use.
Your face already has beautiful structure. Highlighting just shows the world where to look.