Contouring is the single technique that separates a flat makeup application from a sculpted, dimensional face — and it is far easier than social media makes it look. Whether you have never picked up a contour product or you have been sculpting for years and want to refine your method, this how to contour tutorial covers everything: the science behind why it works, the step-by-step technique, adaptations for every face shape, nose contouring, the cream vs powder debate, and the pro MUA methods that Mario Dedivanovic uses on Kim Kardashian and Patrick Ta uses on Gigi Hadid. I have contoured hundreds of faces in my career, and every technique in this guide comes straight from the chair.
What Is Contouring (and Why It Is Back Bigger Than Ever)
Contouring is the art of using dark and light makeup to sculpt the appearance of your bone structure. Darker, cool-toned products mimic natural shadows — they absorb light and make areas visually recede. Lighter, luminous products reflect light and make areas visually advance. Together, they create a three-dimensional illusion on your face that enhances cheekbones, slims the nose, defines the jawline, and lifts the entire face.
The principle is rooted in chiaroscuro — the interplay of light and shadow that Renaissance painters used to create depth on a flat canvas. Max Factor brought this concept to Hollywood in the 1930s, developing a "Beauty Micrometer" device to analyze facial contours and teaching actresses how to sculpt their features for the camera. Drag queens perfected the technique through decades of mentorship, creating feminine bone structure through precise shadow and highlight placement. Kevyn Aucoin's bestselling book Making Faces (1997) introduced contouring to mainstream beauty. And then Kim Kardashian and Mario Dedivanovic made it a global phenomenon in 2012 when Kim's Instagram selfies — showcasing Mario's signature sculpted complexion — replicated across the platform virtually overnight.
— Mario Dedivanovic, Kim Kardashian's makeup artist and founder of Makeup by Mario. The era of heavy Instagram contouring is over — soft sculpting is the modern standard.
In 2025-2026, contouring is officially back, but evolved. Marie Claire UK declared it "officially back" in 2025, while the beauty industry has shifted from sharp, dramatic angles to what experts call "soft sculpting" — enhancing your natural bone structure with blendable cream and liquid formulas rather than reshaping your face entirely. Lisa Eldridge puts it best: "Contouring isn't about adding colour, it's about creating shadow — you want to mimic the way your skin looks when it's in shade."
Contour Products and Tools You Need
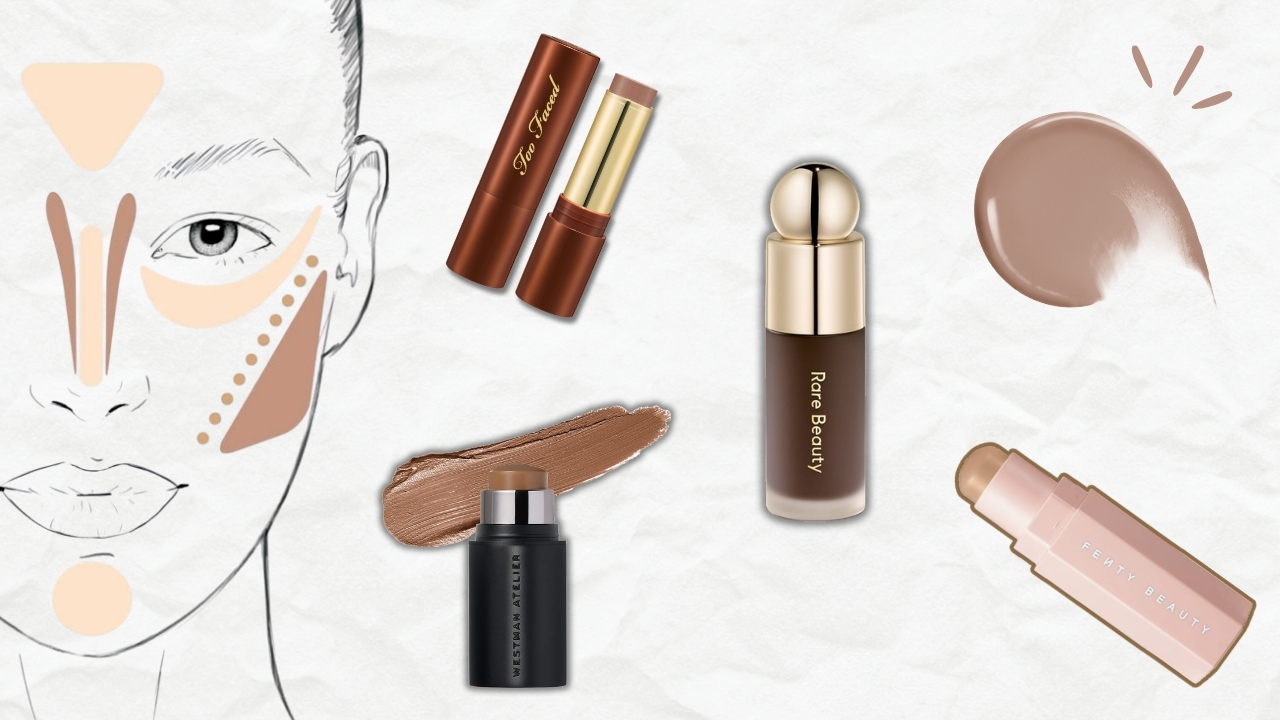
Before sculpting anything, you need the right tools. The product formula matters more than the brand — and the brush matters more than both.
Contour product is your shadow-maker. For beginners, a powder contour palette gives the most control — you can build gradually without streaking. The e.l.f. Contour Palette is an excellent starting point at under $10 with four customizable shades. For the industry gold standard, the Anastasia Beverly Hills Contour Kit delivers the cool-toned precision that professional MUAs swear by. For red-carpet-level sculpting, the Charlotte Tilbury Filmstar Bronze and Glow provides a silky, light-reflecting finish that photographs beautifully. And for a true all-in-one pro palette, the MAKE UP FOR EVER HD Skin Face Essentials Palette combines contour, blush, and highlight in one sleek compact with ultra-blendable HD powder formulas that perform under any lighting.
Cream contour gives a more natural, skin-like finish and is the preferred choice of celebrity MUAs. The Fenty Beauty Match Stix Matte Contour Skinstick is brilliant for precise application with a cream-to-powder finish, while the Charlotte Tilbury Hollywood Contour Wand delivers a buildable liquid formula with an easy wand applicator. The Too Faced Chocolate Soleil Melting Bronzing & Sculpting Stick melts into skin with a warm chocolate-scented formula that blends effortlessly. For a liquid option, the Rare Beauty Soft Pinch Liquid Contour gives a seamless, second-skin finish that builds without caking. And for the ultimate luxury pick, the Westman Atelier Face Trace Contour Stick delivers a buttery, clean-beauty formula that glides on like silk — it is the contour stick that makeup artists reach for when money is no object.
Contour brush: An angled brush is essential for cheekbone placement. The Real Techniques Sculpting Brush has the perfect angle for defining cheek hollows at a price that makes it a no-brainer. For cream products, use a damp beauty sponge or a dense, flat-top brush to blend seamlessly. BK Beauty makes some of the best contour brushes on the market — the BK Beauty 112 Small Angled Face Brush is perfect for precise cheekbone and jawline sculpting, the BK Beauty 116 Small Round Complexion Brush blends cream contour into the hollows seamlessly, and the BK Beauty 109 Mini Contoured Foundation Brush doubles as a contour blending tool for a flawless, diffused finish.
Setting powder: Lock your contour in place with the Laura Mercier Translucent Loose Setting Powder. This step is critical for cream contour — without it, your sculpting will shift and fade within hours.
How to Choose Your Contour Shade
The wrong shade is the number one reason contouring looks unnatural. Your contour product should mimic a natural shadow on your face — not add warmth, not add color, just shadow. Here is how to get it right.
The rule: Choose a shade two to three shades darker than your foundation with the same undertone as your skin. Cool undertones need taupe and grayish shades. Warm undertones need golden browns and soft chocolates. Neutral undertones can go either direction but should lean slightly cool since natural shadows tend to read cool.
By skin tone: Fair skin looks best with soft taupe shades — anything too dark will look like a stripe. Medium skin works beautifully with caramel and mocha tones. Olive skin needs golden-olive or warm brown shades with red or olive undertones. Tan skin pairs well with warm brown and terracotta — avoid shades that lean too gray. Deep skin looks stunning with rich espresso, chocolate, and deep plum — avoid grayish or overly cool shades that can look ashy.
The biggest mistake: Using bronzer as contour. Bronzer adds warmth and a sun-kissed glow. Contour mimics shadow — it is cooler, deeper, and more muted. They serve completely different purposes. A warm, orange-toned bronzer in the hollows of your cheeks will look muddy, not sculpted. Save your bronzer for the high points where the sun naturally hits.
Watch how the pros select and apply the right contour shade:
How to Contour Your Face: Step-by-Step Tutorial
This is the core technique. Master these steps, and every face-shape adaptation and advanced method becomes a simple modification rather than a new skill.
Step 1: Prep your skin. Apply moisturizer and primer. Let it set for two minutes. Then apply your foundation and concealer as normal — contour goes on top of your base. Patrick Ta is the notable exception here — he contours before foundation for an ultra-seamless finish. If you are a beginner, stick with contour after foundation until you are comfortable with placement.
Step 2: Find your hollows. Suck in your cheeks and make a fish face. Feel the hollow that forms under your cheekbones — that diagonal line from your ear toward the corner of your mouth is your contour placement. This is the most important landmark on your face for contouring.
Step 3: Apply your contour. Using an angled brush for powder or a sponge for cream, sweep your contour shade along the hollow of each cheekbone. Start at the ear and blend toward the mouth, stopping about two fingers' width from the corner of your lips. Never bring contour all the way to your mouth — it creates a skeletal effect. Mario Dedivanovic's technique: apply slightly above the hollows and work back toward the ears for a more modern, lifted placement.
Step 4: Contour your temples. Apply a light sweep of contour along each temple, blending into the hairline. This narrows the upper face and creates a more sculpted forehead. Blend until there are no visible edges.
Step 5: Define your jawline. Sweep contour along the underside of your jawline from ear to chin. This creates shadow beneath the jaw and adds definition. Blend downward into the neck so there is no harsh line where makeup meets skin.
Step 6: Highlight. Apply highlighter or a light concealer to the tops of your cheekbones, the bridge of your nose, the center of your forehead, your Cupid's bow, and the center of your chin. These are the high points where light naturally hits — brightening them creates the contrast that makes your contour come alive.
Step 7: Blend, blend, blend. This is where most people rush and ruin everything. Use a damp beauty sponge or a clean fluffy brush to blend all edges until contour and highlight melt seamlessly into your base. Charlotte Tilbury's rule: "contouring is all about the blend." If you can see where your contour starts and stops, you have not blended enough.
Step 8: Set. Dust translucent setting powder over the contoured areas, pressing gently rather than sweeping. For cream contour, this step is non-negotiable — it locks the product in place and prevents it from migrating into your foundation throughout the day. Finish with setting spray for all-day hold.
Watch the full technique in motion — these creators show you exactly how each step looks:
How to Contour by Face Shape
The step-by-step above is your foundation technique — but contour placement shifts based on your face shape. The goal is not to make every face look the same. It is to enhance the structure you already have. Here is how to adapt for each shape.
The goal: Make the face appear longer and more sculpted. Round faces have similar width and length with the cheekbones as the widest point.
Contour placement: Draw contour in a "3" shape — starting at the temples, sweeping under the cheekbones, then curving along the jawline. This creates vertical lines that elongate the face.
Temples: Apply contour to create the illusion of a narrower forehead.
Highlight: Center of forehead, bridge of nose, tops of cheekbones, chin — draw attention to the center vertical axis to visually elongate.
Pro tip: Keep cheekbone contour slightly more diagonal than horizontal. The angle creates the illusion of length that round faces benefit from most.
The goal: Enhance what is already balanced. Oval faces are considered the "ideal" shape — the forehead is slightly wider than the chin with a gentle narrowing at the jawline.
Contour placement: Standard cheekbone contour works perfectly. Apply on either side of the forehead for a shading effect to make it appear slightly shorter. Take contour deeper into the hollows of the cheekbones to enhance sculpting.
Jawline: Apply to the outer jawline for a chiseling effect — but keep it light. Oval faces need the least contour correction of any shape.
Pro tip: Focus more on highlight than contour. The goal is to enhance dimension, not reshape.
The goal: Soften angular features rather than add more structure. Square faces have strong jawlines with the forehead, cheekbones, and jaw at roughly equal width.
Jawline (key area): Draw contour along the jawline from ears to just before the chin. Blend downward. Use a scooping motion and outline in a rounded manner rather than chiseled, to ease the edges.
Forehead: Contour along outer edges near temples to narrow the appearance of a broad forehead.
Highlight: Center of forehead, bridge of nose, center of chin — draw attention inward and away from angular edges.
Pro tip: Never add more angular contour to an already angular face. Your strokes should be curved and soft, working against the natural lines rather than following them.
Square face contouring — placement guide for softening angles
@emblawigum
The goal: Balance the wider forehead with the narrower, pointed chin. Heart-shaped faces have a wider forehead, prominent cheekbones, and a narrow chin.
Forehead (key area): Apply contour along the temples and sides of the forehead. Blend upward and outward toward the hairline to visually narrow it.
Cheekbones: Find hollows by making a fish face. Apply from mid-ear diagonally toward corners of mouth, stopping mid-cheek.
Chin: Apply a small amount of contour on either side of the chin to soften the point and create a more rounded appearance.
Pro tip: Highlight the Cupid's bow and tops of cheekbones to draw attention to the mid-face, creating visual balance between the wider top and narrower bottom.
The goal: Visually shorten the face and add width. Long faces are significantly longer than they are wide with a straight forehead, cheeks, and jawline.
Hairline (key area): Apply contour along the hairline across the forehead to reduce forehead height and shorten the face.
Chin: Contour the tip of the chin to further reduce perceived length.
Cheekbones: Contour from ears, tapering off midway — keep it more horizontal rather than diagonal to add width.
Pro tip: Highlight under the eyes and on the brow bone to bring focus to the center of the face, balancing overall length. Skip chin highlighter as it will elongate further.
The goal: Soften cheekbone angles and balance the narrow forehead and chin with the wider cheeks. Diamond faces have high, prominent cheekbones with a narrow forehead and pointed chin.
Cheekbones: Contour along the tips of the cheekbones and underneath to create shadow that makes the midface appear narrower.
Temples: Contour into the temples to soften the angular points.
Highlight: Center of forehead and chin, bridge of nose — brighten and draw the eye inward for a more balanced, softer look.
Pro tip: Diamond faces have gorgeous natural bone structure. Use a light hand — you need less contour than you think.
See how contouring changes for different face shapes — these tutorials demonstrate the differences:
How to Contour Your Nose
Nose contouring is the most precise work in all of contouring — and the easiest to overdo. The key is subtlety and a small, firm brush. Use a pencil brush or thin angled brush and a matte contour shade one to two shades darker than your skin.
Wide nose: Draw contour lines on either side of the bridge, keeping them pinched closer to the center than the natural nose width. Apply shadow along the sides of the nostrils to visually reduce their width. Run a thin line of highlighter down the center bridge to draw attention to the narrow center.
Long nose: Apply darker contour at the tip of the nose to make it visually recede. Draw contour lines on the sides of the bridge but stop them short — do not extend to the tip. Apply highlighter only on the upper two-thirds of the bridge.
Bumpy nose: Apply contour directly on the bump to make it appear shorter. Add subtle highlight above and below the bump to create an even plane.
Button nose: Draw contour lines extending from the inner corners of the brows straight down the sides of the nose bridge to create a longer appearance. Apply highlight to the tip to attract light and create a glowing effect.
Mario Dedivanovic warns: "It's hard to sculpt the nose; the secret is to use minimum product and to blend. Not blending is the biggest mistake people make." A clinical study from the Aesthetic Surgery Journal confirms that nose contouring effects are "largely restricted to the frontal view" — so keep it soft, because harsh lines will be visible from any other angle.
Watch these nose contour techniques up close:
Cream vs. Powder Contour: When to Use Each
This is the most common question I get from clients, and the answer depends on your skin type, desired finish, and experience level.
Cream Contour
Blends easily into skin for a natural, dewy finish. More forgiving of mistakes — you can re-blend at any point. Can be applied with your fingers for convenience. Better for dry and mature skin since it does not cling to dry patches or settle into fine lines. Must be set with powder to last.
Powder Contour
Generally longer-lasting than cream. Quicker to apply and easier to achieve a matte finish. Better for oily skin since it helps absorb excess oil and stays put longer. More buildable and forgiving for beginners. Can look cakey or patchy on dry skin if over-applied.
The Sandwich Method
Apply cream contour first as the base layer, blend thoroughly, then set with powder contour on top. This gives you the dewy dimension from cream plus the long-lasting structure from powder. Professional MUAs use this for weddings and events where durability is essential.
His Major Sculpt Creme Contour and Powder Bronzer Duo is designed specifically for the layering technique — cream for dimension, powder for staying power.
See both cream and powder contour compared side by side:
Contouring for Mature Skin
Mature skin deserves its own section because the technique shifts are specific and important. This is a gap that most contour guides ignore entirely — and it should not be, because contouring can be incredibly flattering on mature skin when done correctly.
Use cream formulas exclusively. Powder contour settles into fine lines and wrinkles, creating a textured, aging effect. Cream formulas blend more easily on skin that has lost some elasticity and add a dewiness that makes skin look more youthful.
Go lighter than you think. Use a contour shade only one to two shades darker than your foundation — not three. Mature skin has less collagen and can look drawn if contour is too dark. Soft definition is the goal, not dramatic sculpting.
Focus on lifting placement. Apply contour slightly higher than the standard cheekbone hollow — closer to the cheekbone itself. Angle your strokes upward toward the temple rather than downward toward the mouth. This creates a lifting effect that counteracts the natural downward migration of facial fat pads.
Skip heavy lower lash line contour. Contouring under the jawline is beautiful on mature skin, but avoid heavy product near the eyes or lower face where skin is thinnest. Highlight the tops of the cheekbones and inner corners of the eyes instead — brightness reads as youth.
Set with a light hand. Use a finely milled translucent powder, pressing gently rather than sweeping. Too much setting powder will dry out cream contour and settle into lines.
Common Contouring Myths vs. Facts
I have corrected every one of these mistakes on clients in my chair. If your contour is not working, the answer is almost certainly one of these.
"Bronzer and contour are basically the same thing."
Tap to revealThey serve completely different purposes. Contour mimics shadow — it is cooler, deeper, and muted. Bronzer adds warmth and a sun-kissed glow. Using bronzer as contour creates a muddy, orange stripe rather than a natural-looking shadow. Save bronzer for the high points where the sun naturally hits.
"You should contour after applying foundation."
Tap to revealThe traditional and beginner-friendly method is contour after foundation. However, celebrity MUA Mary Phillips pioneered the "underpainting" technique — contouring before foundation — which creates an ultra-seamless, skin-like finish. Patrick Ta also contours before foundation. Both methods work; choose based on your skill level.
"Contouring makes your face look fake and obvious."
Tap to revealBad contouring looks obvious. Good contouring is invisible. As Lisa Eldridge says: "The bottom line is contouring needs to look as NATURAL as possible." If someone can tell you are wearing contour, you either used too much product, chose the wrong shade, or did not blend enough. Soft sculpting with cream products can look completely natural.
"You need expensive products to contour well."
Tap to revealTechnique matters infinitely more than product price. An e.l.f. palette with proper placement and blending will outperform a luxury palette used poorly. Mario Dedivanovic himself says "less is more" — use minimal product and build up. The brush and blending matter more than the brand name on the compact.
Three more critical mistakes to watch for: choosing a contour shade with the wrong undertone (cool shadows for cool skin, warm for warm — never orange), not blending into the hairline (leaving visible lines at the temples that stop abruptly), and contouring areas that do not need it (over-contouring the entire face creates an unbalanced, disproportionate look — contour only the areas specific to your face shape).
Contouring Trends for 2026
Contouring never stays static — it evolves with the culture. Here are the techniques and approaches dominating right now.
The 2026 standard. Uses cream and liquid products that "melt into the skin" to create shadow play that mimics natural bone structure rather than dramatically reshaping it. Mario Dedivanovic describes it as a "softer approach" driven by "the younger generation" who want to "appear more natural and less intimidating." Think enhanced cheekbones, not chiseled cheekbones.
Mary Phillips' viral technique: apply contour and highlighter BEFORE foundation, then apply a light hand of foundation over top. The result is a "diffused, skin-like finish" with depth and dimension that looks like your actual bone structure. The #underpainting hashtag has over 105 million views on TikTok. Hailey Bieber calls it "the Mary P contour trick forever."
A deliberate counter-trend gaining traction on TikTok — unapologetic nose contour with visible lines that "refuse to be blended." Instead of subtle shadow, this technique uses sharp, intentional lines to dramatically reshape the nose as a statement. The opposite of the soft sculpting movement, and proof that beauty trends can run in opposite directions simultaneously.
In 2026, blush is being "diffused outward for a softer, fuller effect that creates structure without harsh lines." Warm blush placed slightly below the cheekbone creates a flattering shadow effect while adding color — blurring the line between blush and contour placement. Multi-functional palettes combining contour, blush, and highlight in one compact are dominating the market.
Watch the latest trending contour techniques in action:
Test Your Contouring IQ
Test Your Contouring IQ
5 questions. How well do you really know this stuff?
Frequently Asked Questions About Contouring
Contour mimics natural shadow to sculpt and define bone structure — it is cooler, deeper, and matte. Bronzer adds warmth and a sun-kissed glow to the high points of the face. Using bronzer in contour placement creates a muddy, orange effect rather than a natural shadow. They serve different purposes and should not be used interchangeably.
The primary contour placement is along the hollows of the cheekbones — suck in your cheeks to find them. Additional placement includes the temples, sides of the forehead, under the jawline, and along the sides of the nose. Highlight goes on the opposing high points: tops of cheekbones, bridge of nose, center of forehead, Cupid's bow, and chin.
It depends on your skin type. Cream contour is better for dry and mature skin — it blends easily and adds a natural, dewy finish. Powder contour is better for oily skin — it helps absorb oil and lasts longer. For events, professional MUAs use both: cream first for dimension, then powder on top for staying power.
Choose a shade two to three shades darker than your foundation with the same undertone as your skin. Cool undertones need taupe shades, warm undertones need golden browns, and neutral undertones should lean slightly cool. Avoid shades that are too warm or orange — natural shadows are cool-toned, not bronzed.
Contouring itself is not harmful to your skin. Dermatologists recommend using non-comedogenic products to avoid clogged pores, and the American Academy of Dermatology confirms that properly selected makeup is safe for all skin types including acne-prone skin. The critical step is thorough removal — always remove all makeup before bed with a gentle cleanser.
Underpainting is a technique pioneered by celebrity MUA Mary Phillips (who works with JLo and Hailey Bieber). You apply contour and highlighter before foundation, then apply a light layer of foundation over top. The result is an ultra-seamless, skin-like finish where sculpting looks like your actual bone structure rather than visible makeup.
The Bottom Line: Shadow, Light, and You
Contouring is shadow and light — darker shades create depth, lighter shades create projection, and blending makes it all disappear into your skin. That is the entire principle. Everything else — which face shape to contour differently, whether to use cream or powder, where exactly to place your brush — is just applying that principle to your unique face.
Start with the basic cheekbone contour if you are new. Add nose contouring when you are comfortable. Experiment with the underpainting technique when you want that next-level seamless finish. The technique that started on ancient stages, defined Hollywood glamour, was perfected by drag queens, and was brought to the mainstream by Kim Kardashian and Mario Dedivanovic is now more accessible and more wearable than ever.
Find the hollows. Place the shadow. Blend until it disappears. That is contouring — and now you know how to do it.